Docs

VIVAshop Documentation

Manually add content: Adding content to homepage blocks


In addition to the banner blocks we mentioned about in the "Adding banners” section, VIVAshop also comes with several other blocks on the homepage, like product blocks, a call-to-action block, an extra info block, a blog posts scroller, a brands scroller as well as several blocks with featured products and banner tabs. Below we’ll go through all of them so you may learn how to add content to these blocks, as well as customize them.


Product blocks


1. Products scroller tabs
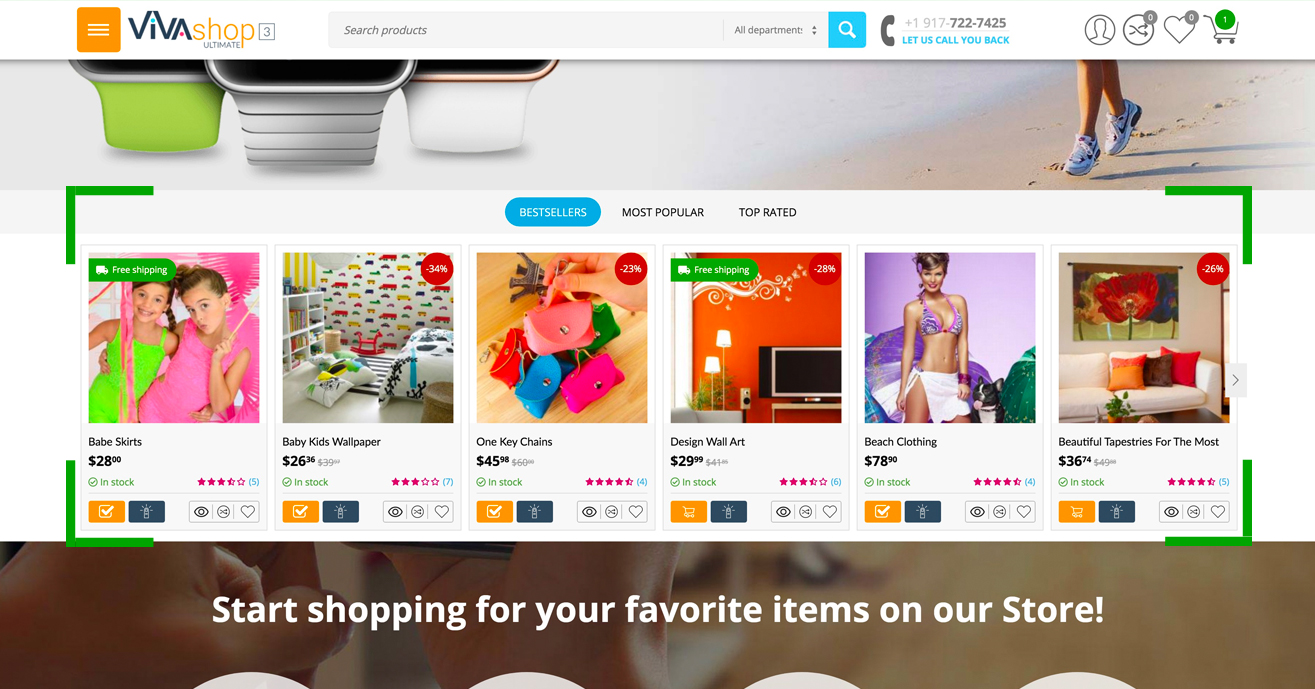


Right below the homepage main slider banners, we have included 3 tabs with products scollers: "Bestsellers”, "Most Popular” and "Top Rated”. Of course you can change the name of any of them, as well as choose any products of your choice to display under each tab. Below are the steps that you need to take in order to add content to the "Bestsellers” block, for the other two blocks ("Most Popular” and "Top Rated”) all you have to do is to simply repeat the process:


  • Step 1

In your admin panel, go to "Design” - "Layouts”:
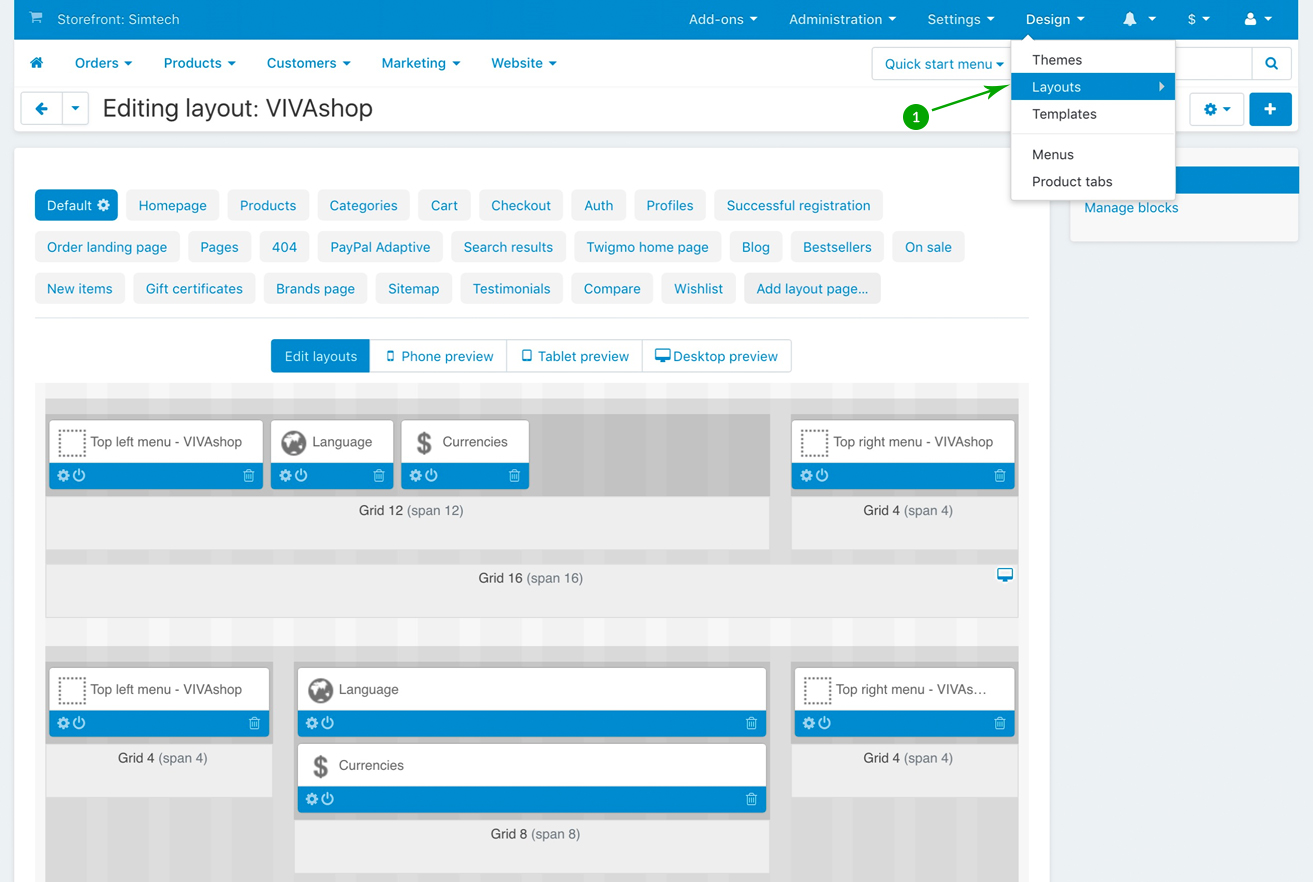
 

  • Step 2

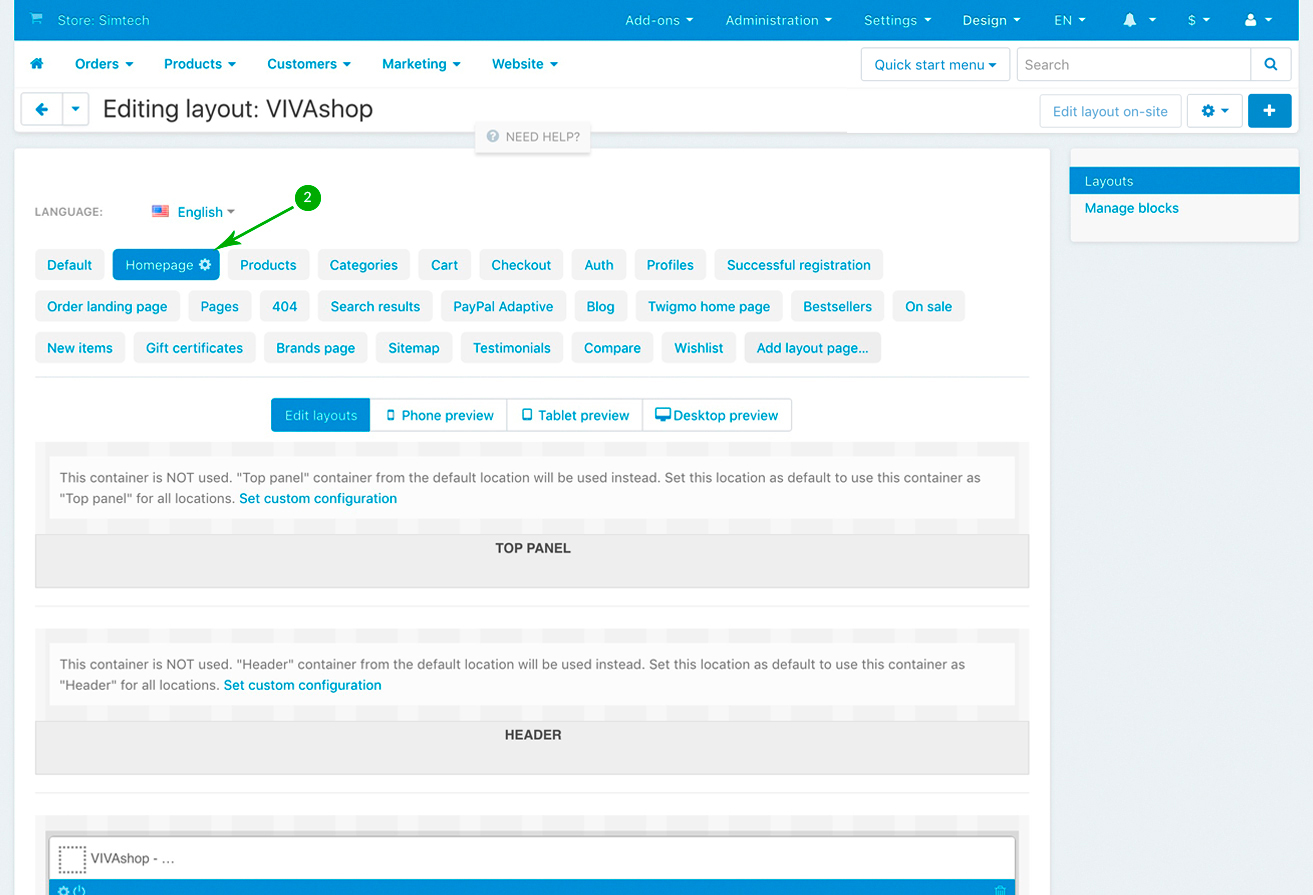
Click on the "Homepage” tab


  • Step 3

Scroll down and look for the “Bestsellers” block, and click on the “Block options” of this block
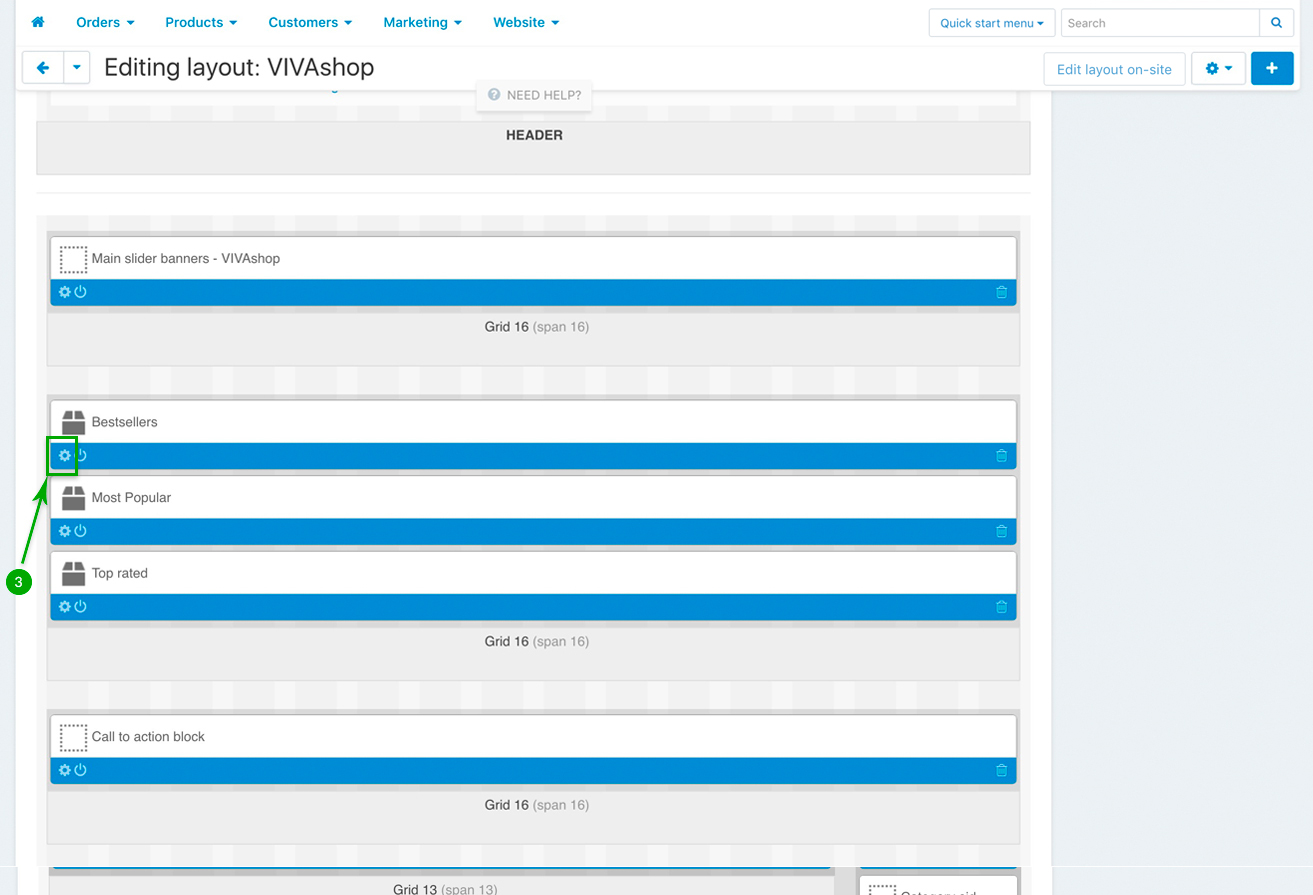
 

  • Step 4

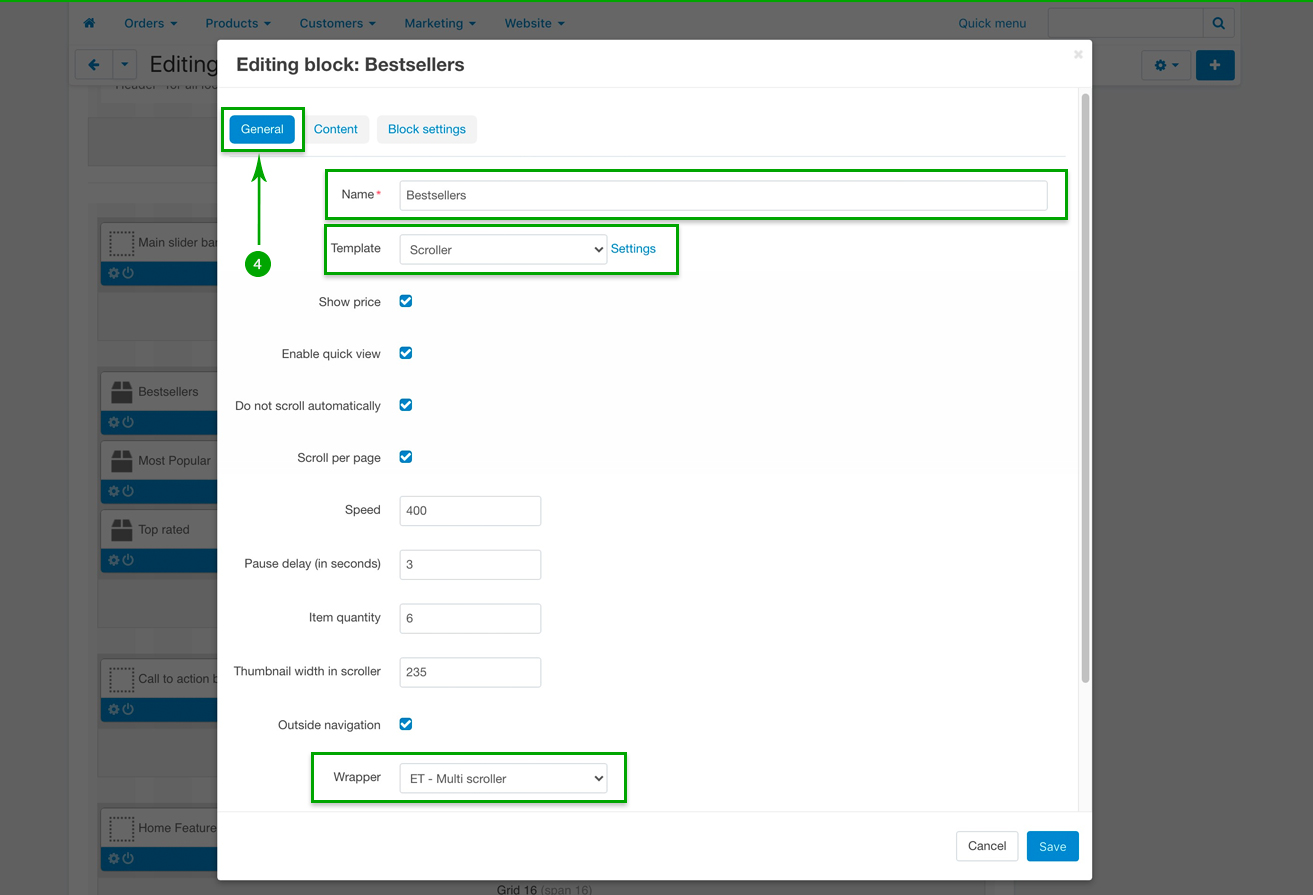
In the newly opened pop-up window, under the “General” tab, if you wish, change the block Name, as well as the other settings according to your preferences. The “Template” should however be “Scroller”, as well as the “Wrapper” should remain “ET - Multi scroller


  • Step 5

Next, because this example is about how to add bestseller products, under the “Content” tab, choose “Bestsellers” from the “Filling” dropdown. However, you can choose any other filling, reflecting the products you want to add under these tabs. When you’re done, simply click on the bottom right “Save” button.
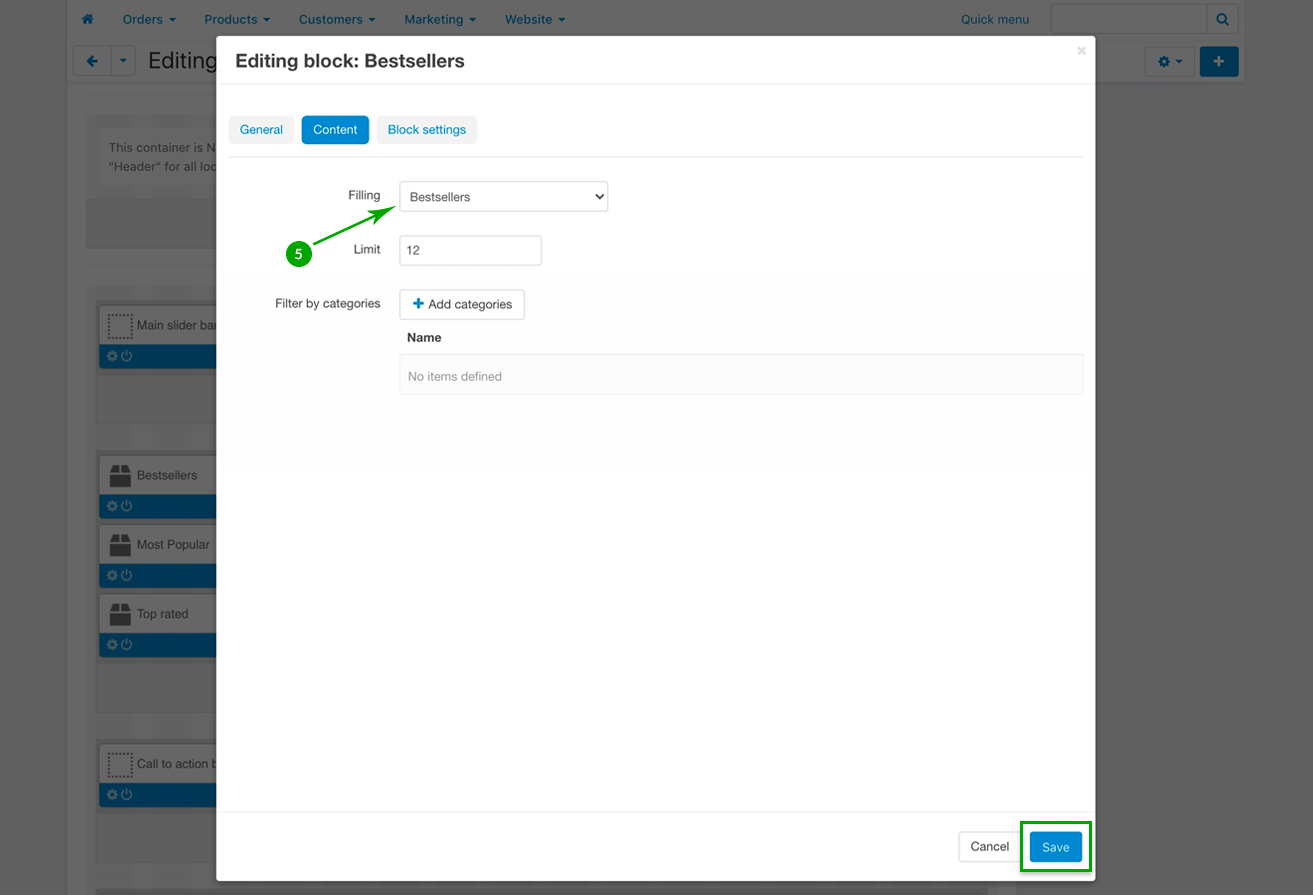
 

  • Step 6

Repeat the above 5 steps in order to add content to the other two blocks (“Most Popular” block and “Top Rated” block).


2. Home featured products
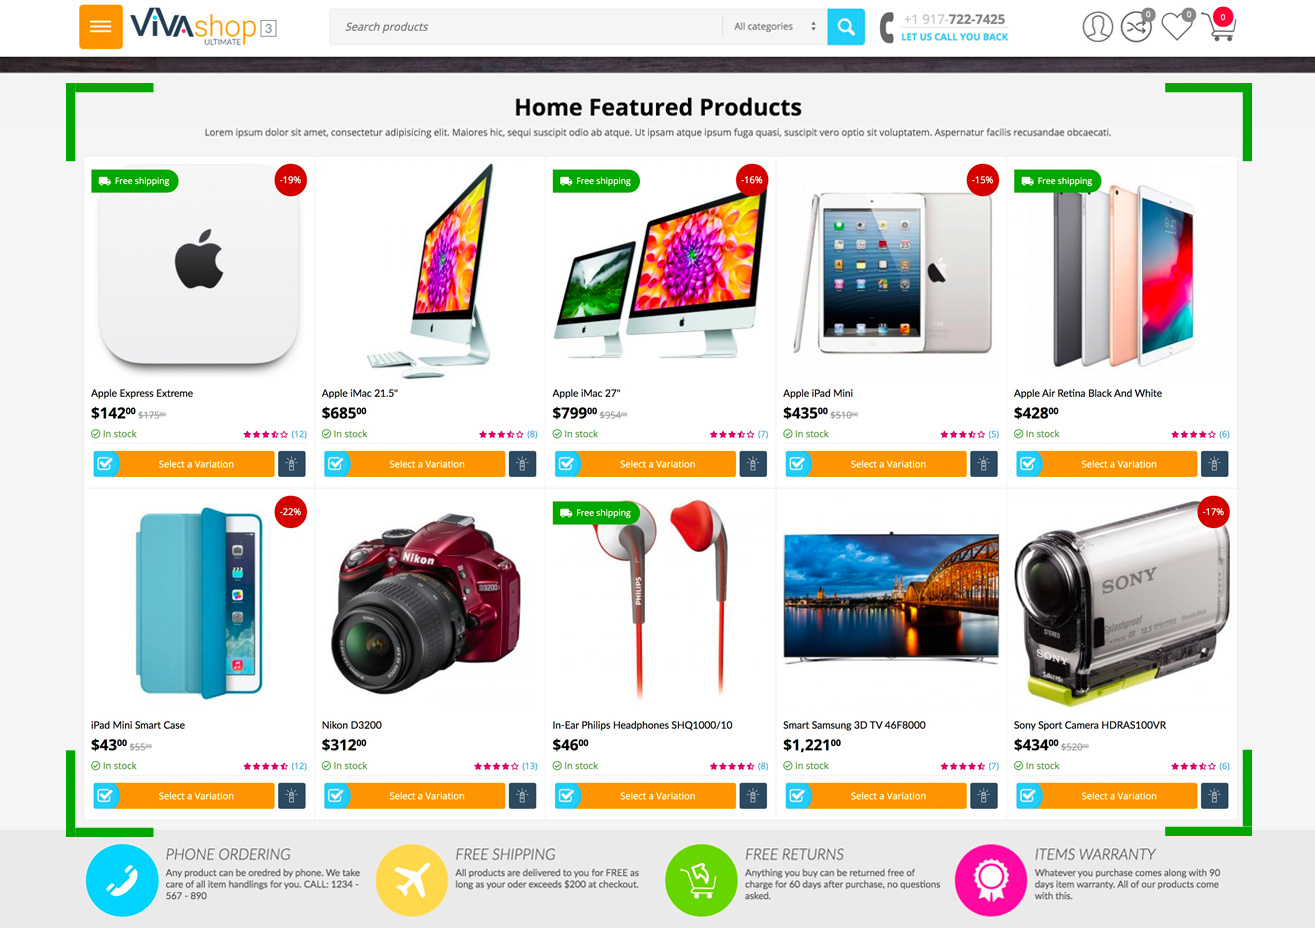


On the homepage we have included a block where you can add any products of your choice. You can choose your own block name, as well as add any custom description you want, telling your visitors a few words about the products you are featuring on your homepage. We have called this block “Home Featured Products”, but again, you can change its name accordingly. Please find below the steps you need to take in order to customize this block with products:


  • Step 1

In your admin panel, go to "Design” - "Layouts”:


  • Step 2

Click on the "Homepage” tab


  • Step 3

Scroll down and look for the “Home Featured Products” block, and click on the “Block options” of this block
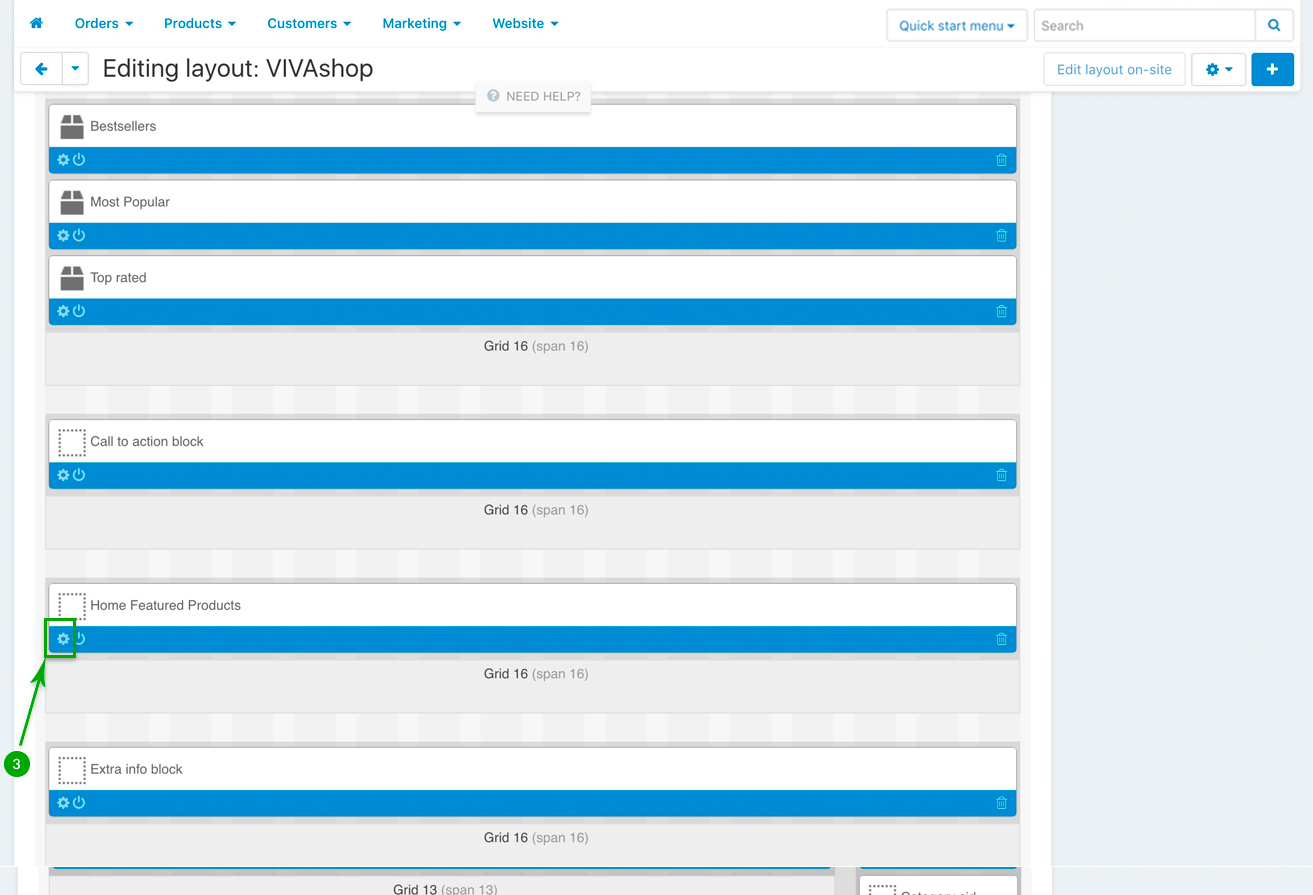
 

  • Step 4

In the newly opened pop-up window, under the “General” tab, if you wish, change the block Name, then click on the “Settings” link and set the “Number of columns in the objects list”, which is the number of columns that you want the featured products to be displayed in. The “Template” should remain “ET - Home grid”, and the “Wrapper” should remain “ET - Home grid” as well.
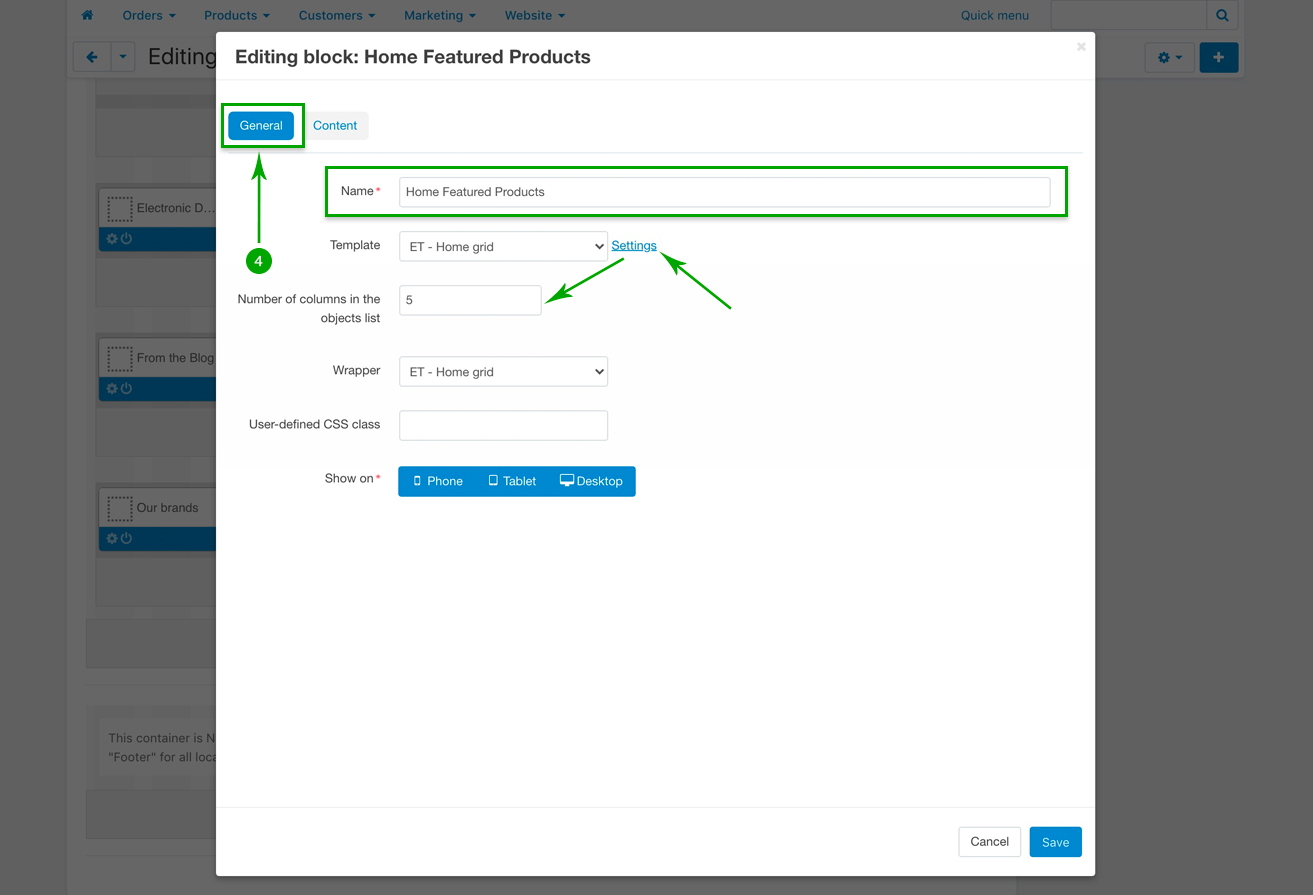
 

  • Step 5

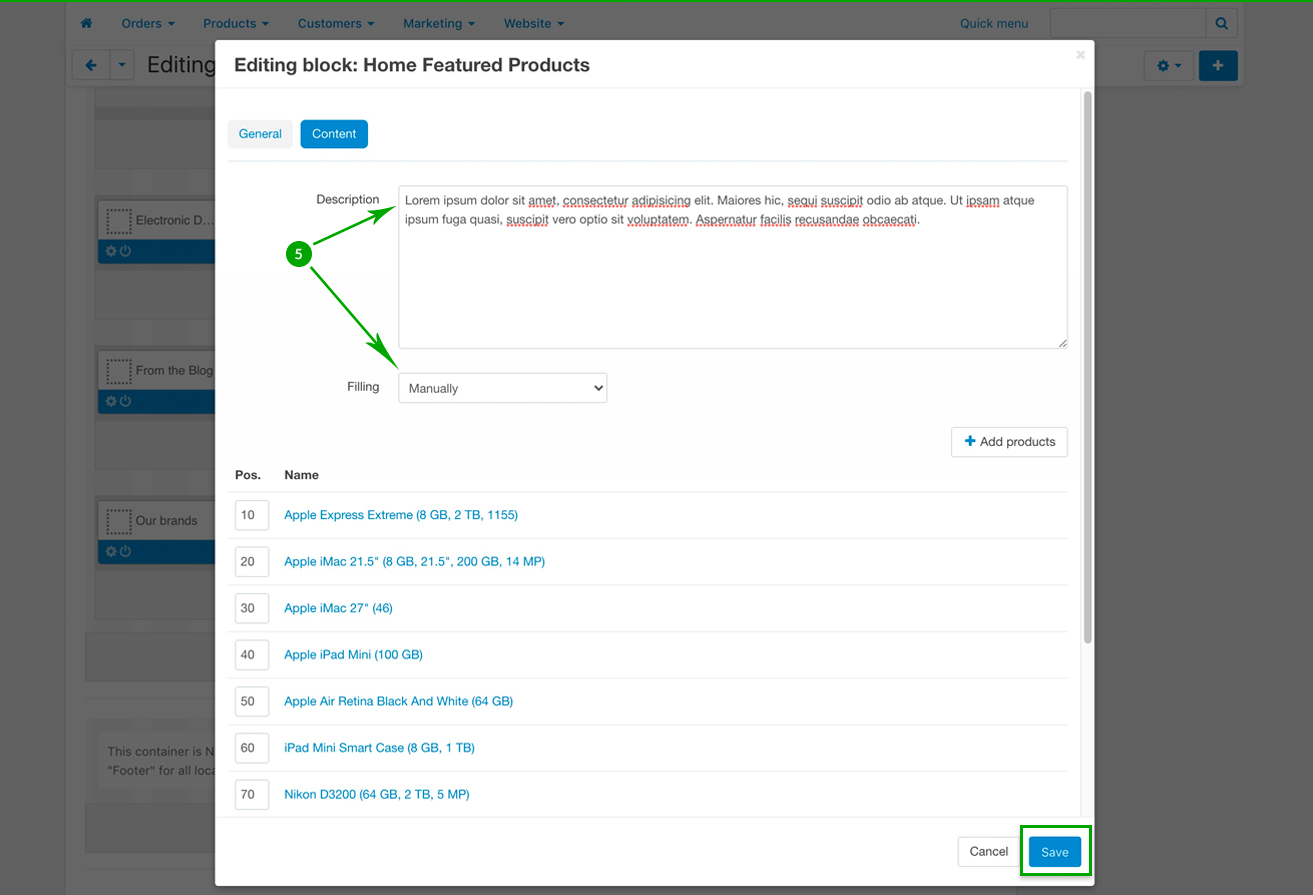
Next, under the “Content” tab, add your own block description, and then choose your filling from the “Filling” dropdown. In this particular example we have manually added products that we wanted to feature on the homepage, so we have chosen the “Manually” filling. When you’re done, click on the bottom right “Save” button.
 

Call-to-action block
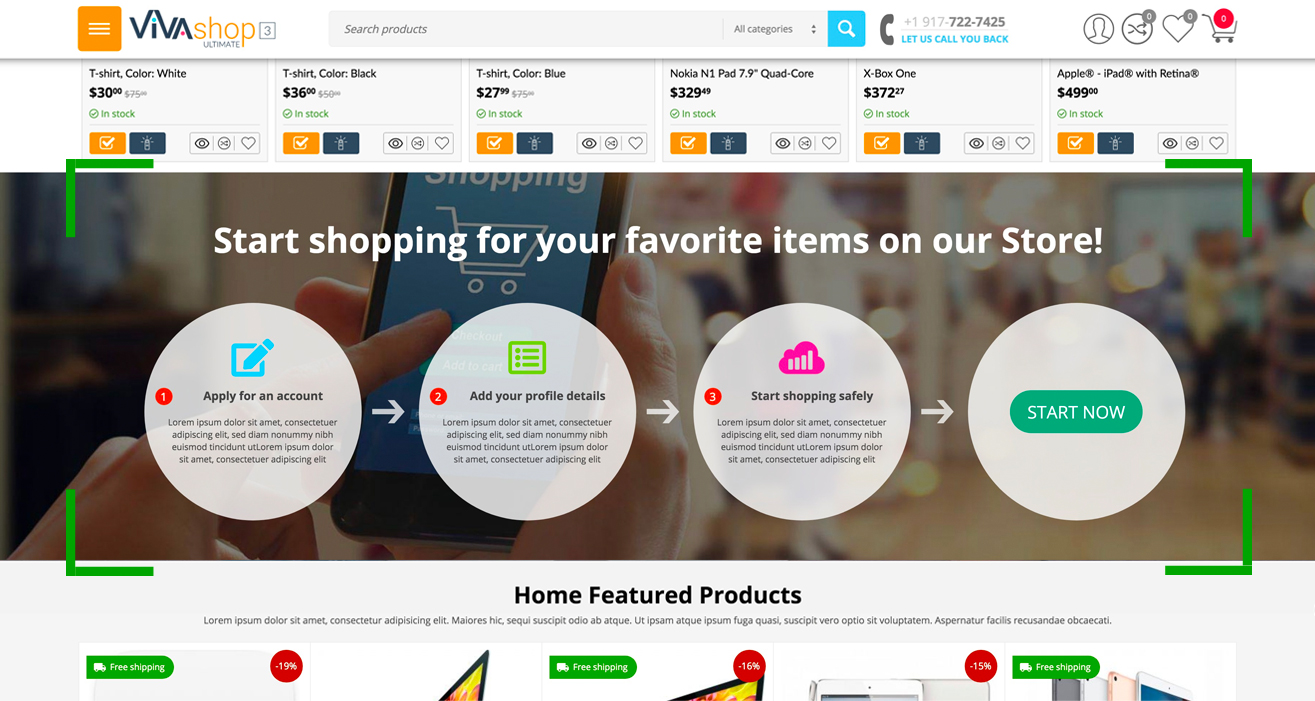


Make your customers take an action of your choice in 3 steps with the help of the “Call to action block” that we have included on the homepage. You can completely customize this block according to your own wishes. Here’s how to do it, as well as the customization options that you have available:

  • Step 1

In your admin panel, go to "Design” - "Layouts”:


  • Step 2

Click on the "Homepage” tab


  • Step 3

Scroll down and look for the “Call to action block” block, and click on the “Block options” of this block
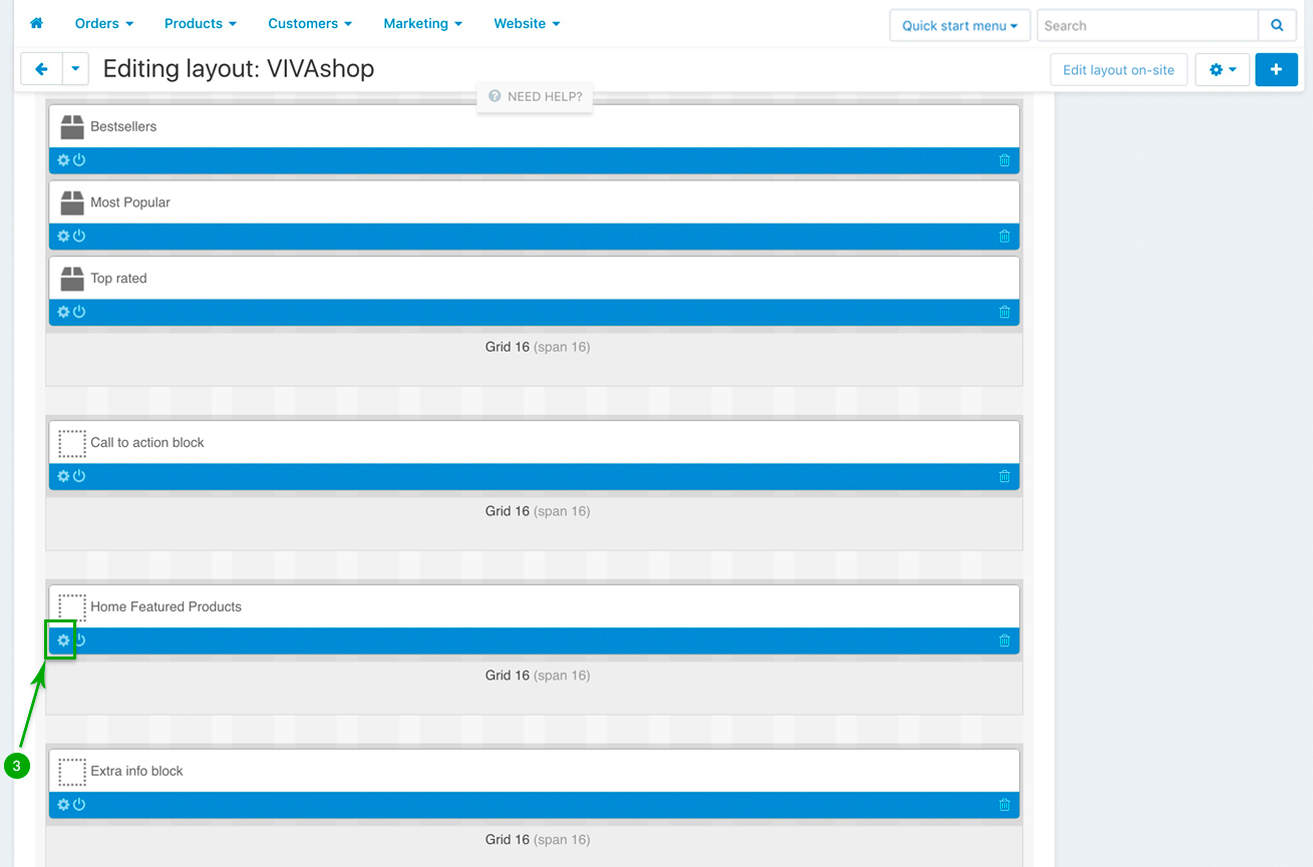
 

  • Step 4

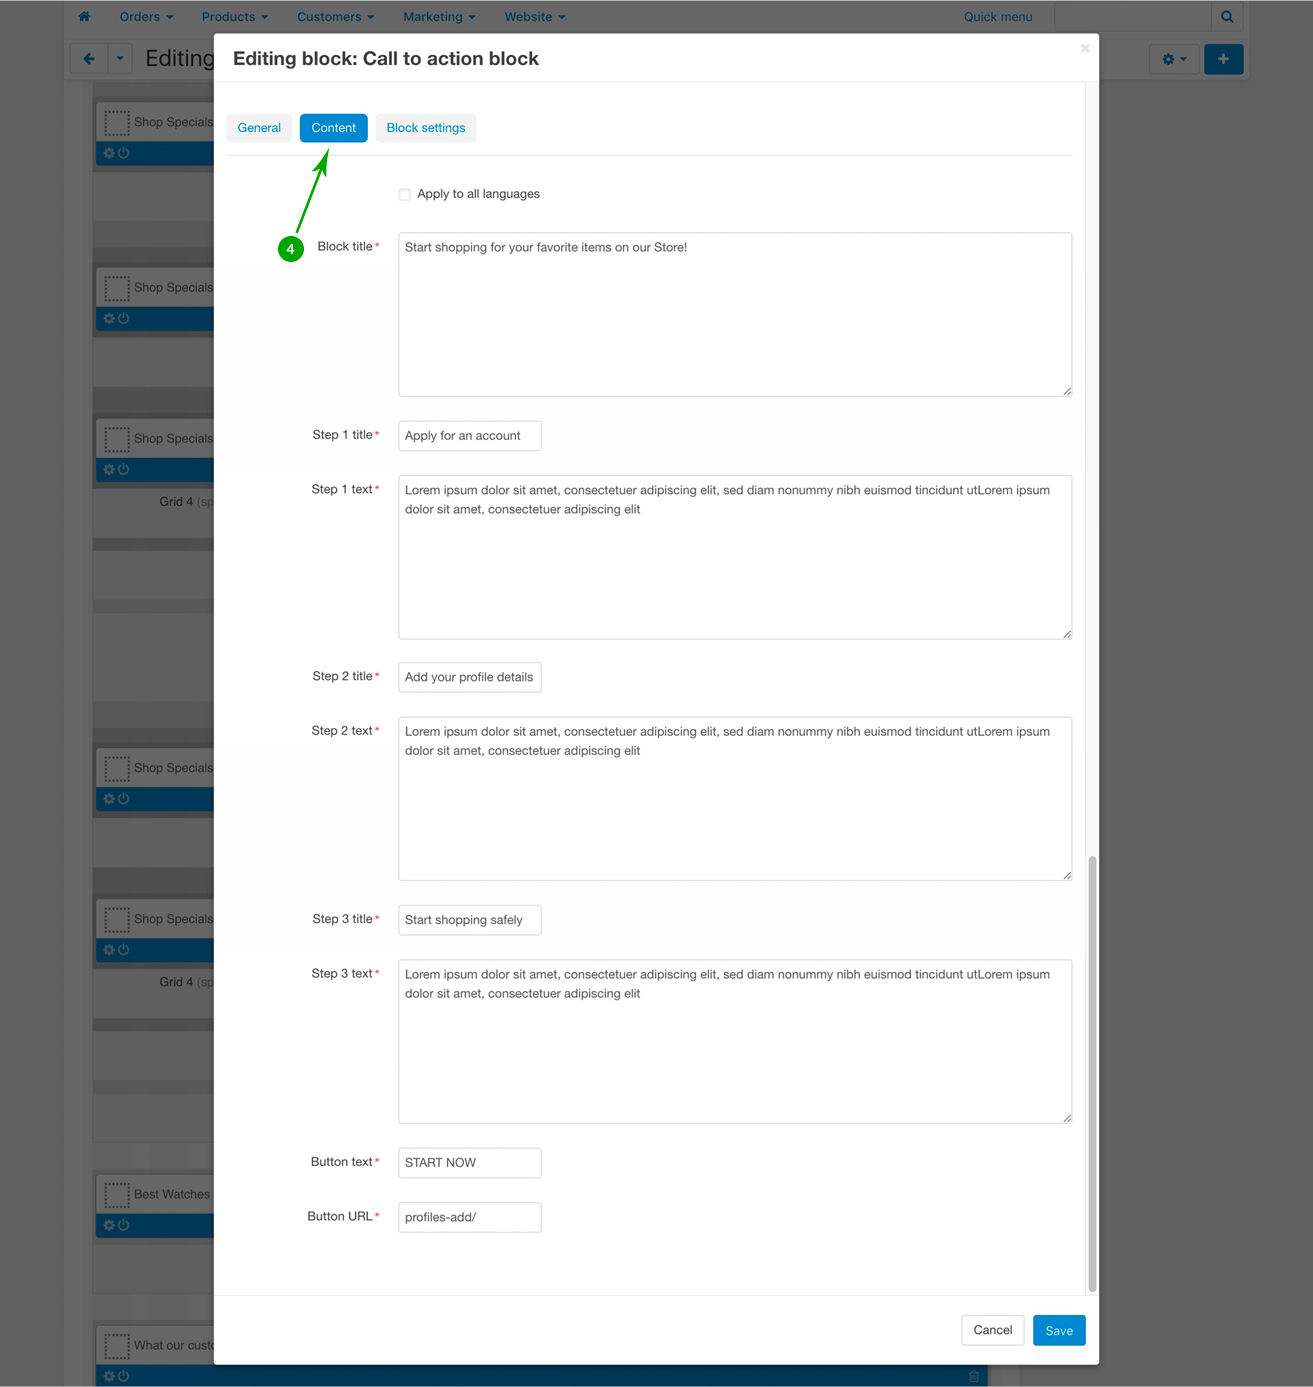
In the newly opened pop-up window, under the “Content” tab, type the text content for your block: block title, step titles and text, button text, as well as the link where you want to forward users when they click on it.
 

  • Step 5

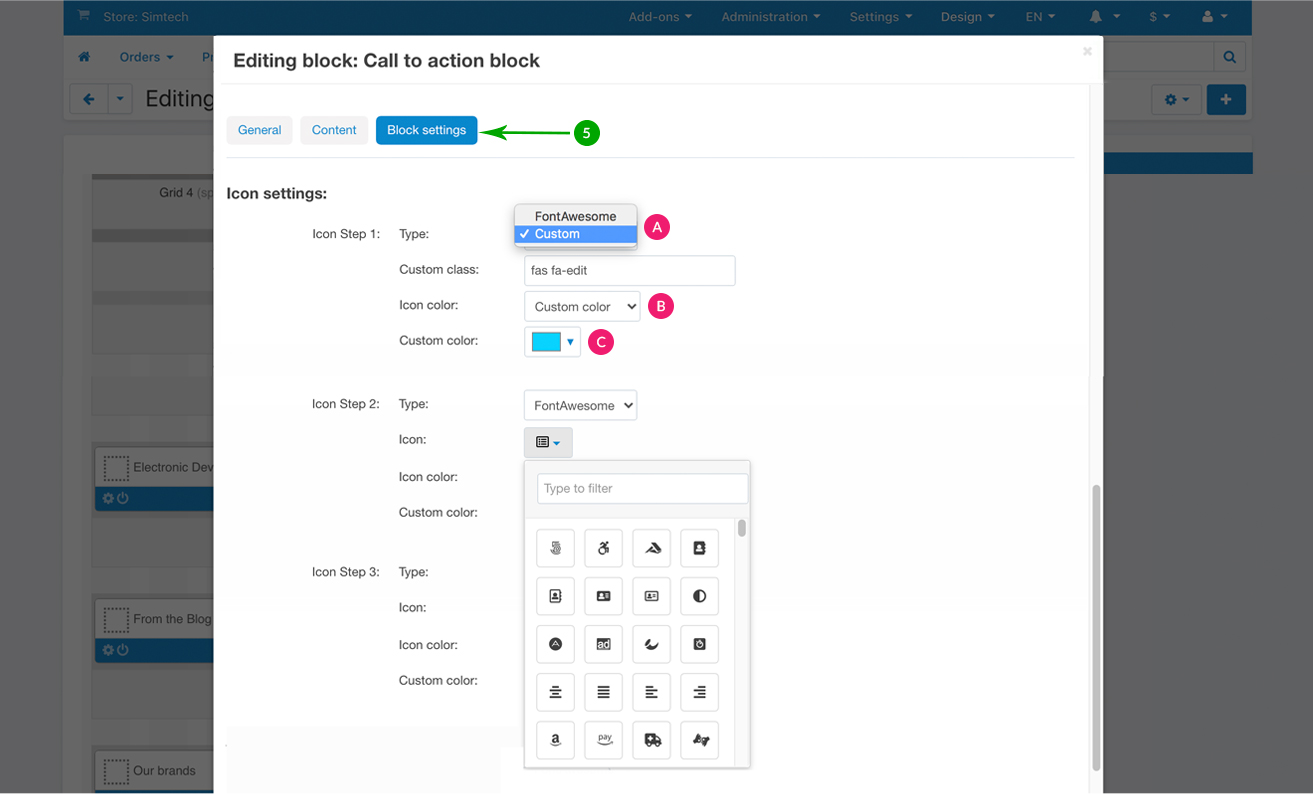
Next, under the “Block settings” tab you can choose your settings for the block background, for the block icons, as well as choose from the available additional settings. Below we’ll explain each section so let’s start with the block background:


Background settings
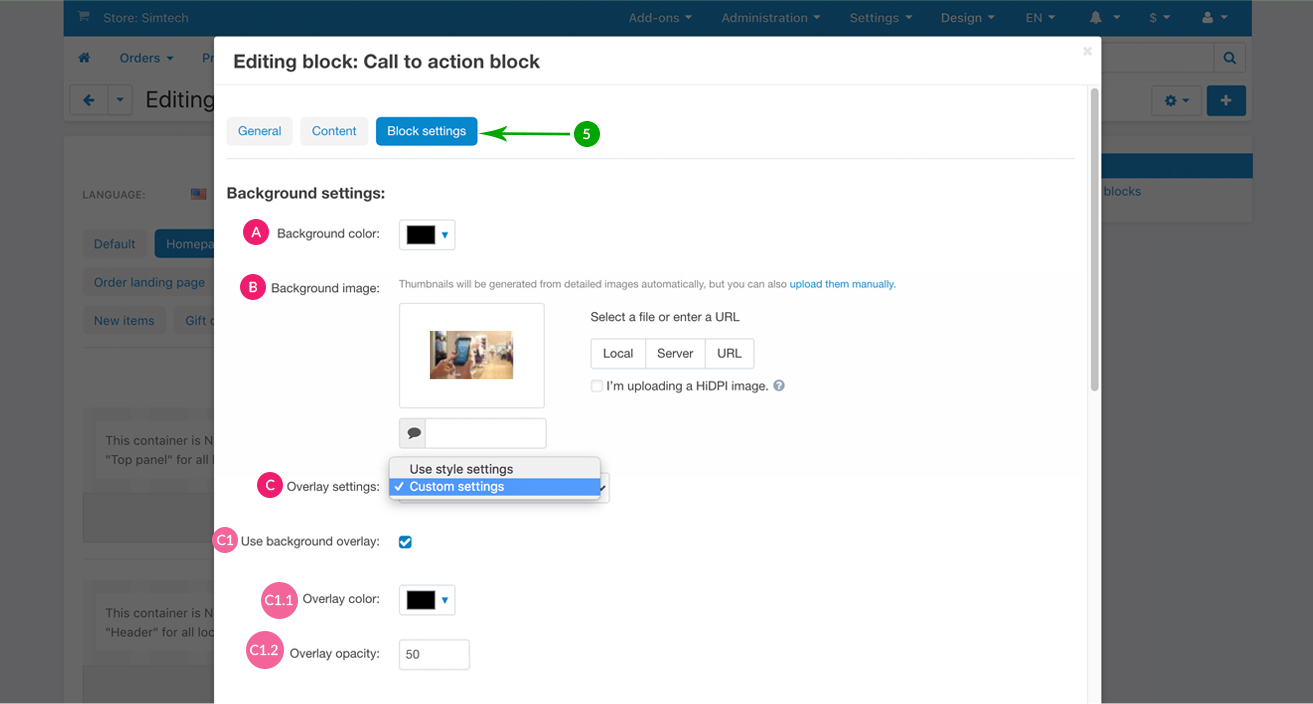
 

A: Background color - If you do not use a background image, then you can set a color for the block background.
B: Background image - Choose a background image. The recommended size is 2400px x 1200px. If you use a background image, the background color selected above will not be visible.
C: Overlay settings - This is a custom color that you can apply over the selected image. You have two options that you can choose from: to use the theme style settings, which uses the settings we have pre-defined in the VIVAshop style that you have chosen to use, while the other choice is to use your own custom settings. Should you choose to use your own custom settings, option C1 (”Use background overlay”) will open.
C1: Use background overlay - This option needs to be checked if you want to use a background overlay (it is already checked by default). Once this option is checked, another 2 options will open (C1.1 and C1.2)
C1.1: Overlay color - Set a color for your background overlay, by choosing it from the color picker, or insert your own color code.
C1.2: Overlay opacity - Set the opacity percentage for your background overlay (only a number should be inserted without the “%” sign).


Icon settings


A: Type - Choose the type of each icon you want to include in the 3 steps of the “Call to action block”. You can either use a Font Awesome icon, or a custom icon. If you choose a Font Awesome icon, all you need to do is to simply search or scroll down in order to pick the desired icon from the “Icon” dropdown. If you choose to add your own icon, then the your custom icon class needs to be added into the “Custom class” field.
B: Icon color - For the icon color you have two options that you can choose from: to use the theme style color, which uses the color we have pre-defined in the VIVAshop style that you have chosen to use, while the other choice is to use your own custom color. So simply pick your choice.
C: Custom color - If in the previous step you have chosen to use a custom color, then a “Custom color” option will automatically be displayed. Set a color of your icon, by choosing it from the color picker, or insert your own color code.


Additional settings


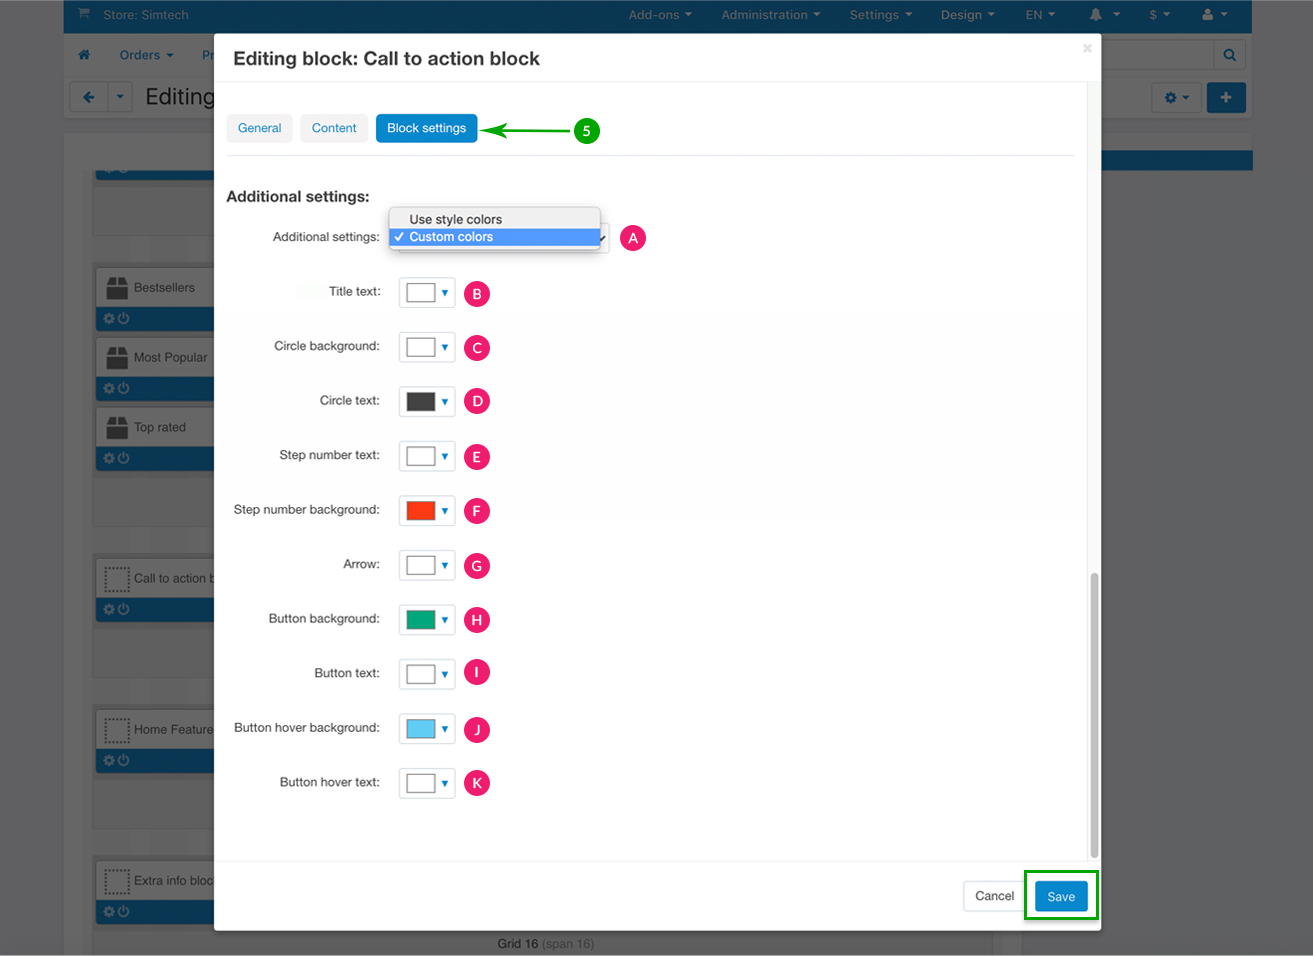
A: Additional settings - Here you have two options that you can choose from: to use the theme style colors, which uses the color we have pre-defined in the VIVAshop style that you have chosen to use, while the other choice is to use your own custom colors. So simply pick your choice. If you choose to use your own custom colors, the rest of the color options will display as follows:
B: Title text color - The color of the text used for the title of the “Call to action block
C: Circle background - The color of the 3 circles inluded in the block
D: Circle text - The color of the text used inside the 3 circles
E: Step number text - The color of the number text used inside the 3 little step circles
F: Step number background - The background color of the 3 little step circles
G: Arrow - The color of the arrows used between the steps
H: Button background - The color of the call-to-action button background
I: Button text - The color of the text inside the call-to-action button
J: Button hover background - The color of the call-to-action button background when you hover the mouse over it
K: Button hover text - The color of the text inside the call-to-action button when you hover the mouse over the button


Extra info block


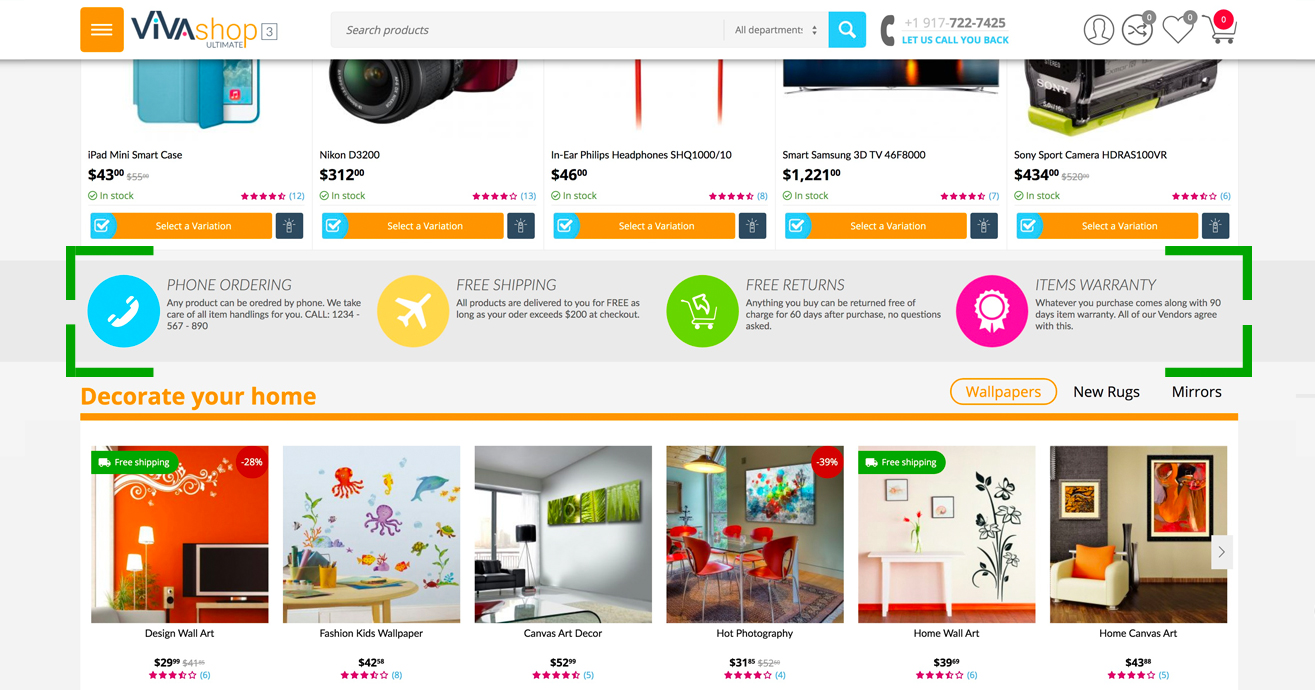
In order to catch your visitor’s attention, on the theme homepage you can include a few important pints specific to your store, though the “Extra info block”. You can completely customize this block according to your own wishes. Here’s how to do it, as well as the customization options that you have available:

  • Step 1

In your admin panel, go to "Design” - "Layouts”:


  • Step 2

Click on the "Homepage” tab


  • Step 3

Scroll down and look for the “Extra info block” block, and click on the “Block options” of this block
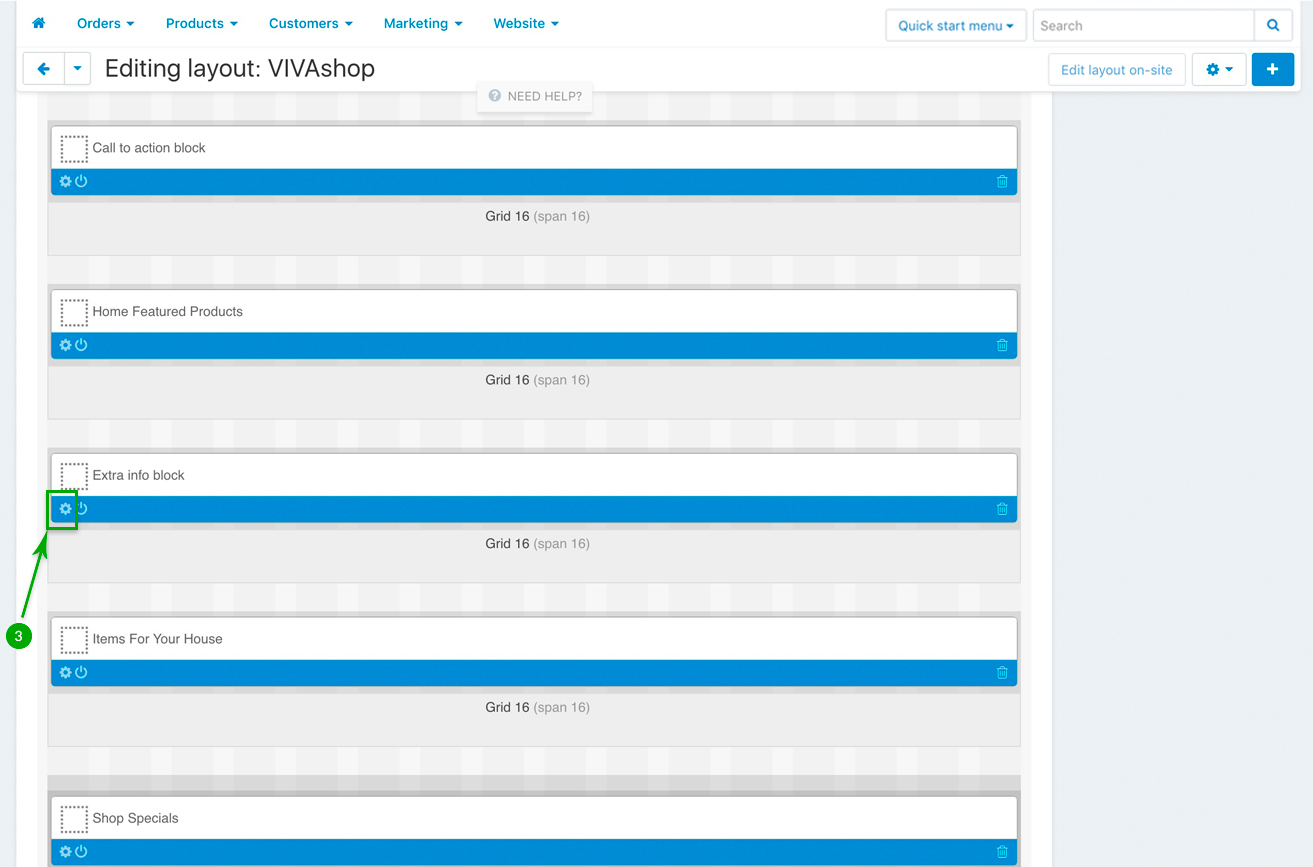
 

  • Step 4

In the newly opened pop-up window, under the “Content” tab, type your desired title and the your custom text for each of the 4 points available in the “Extra info block”.
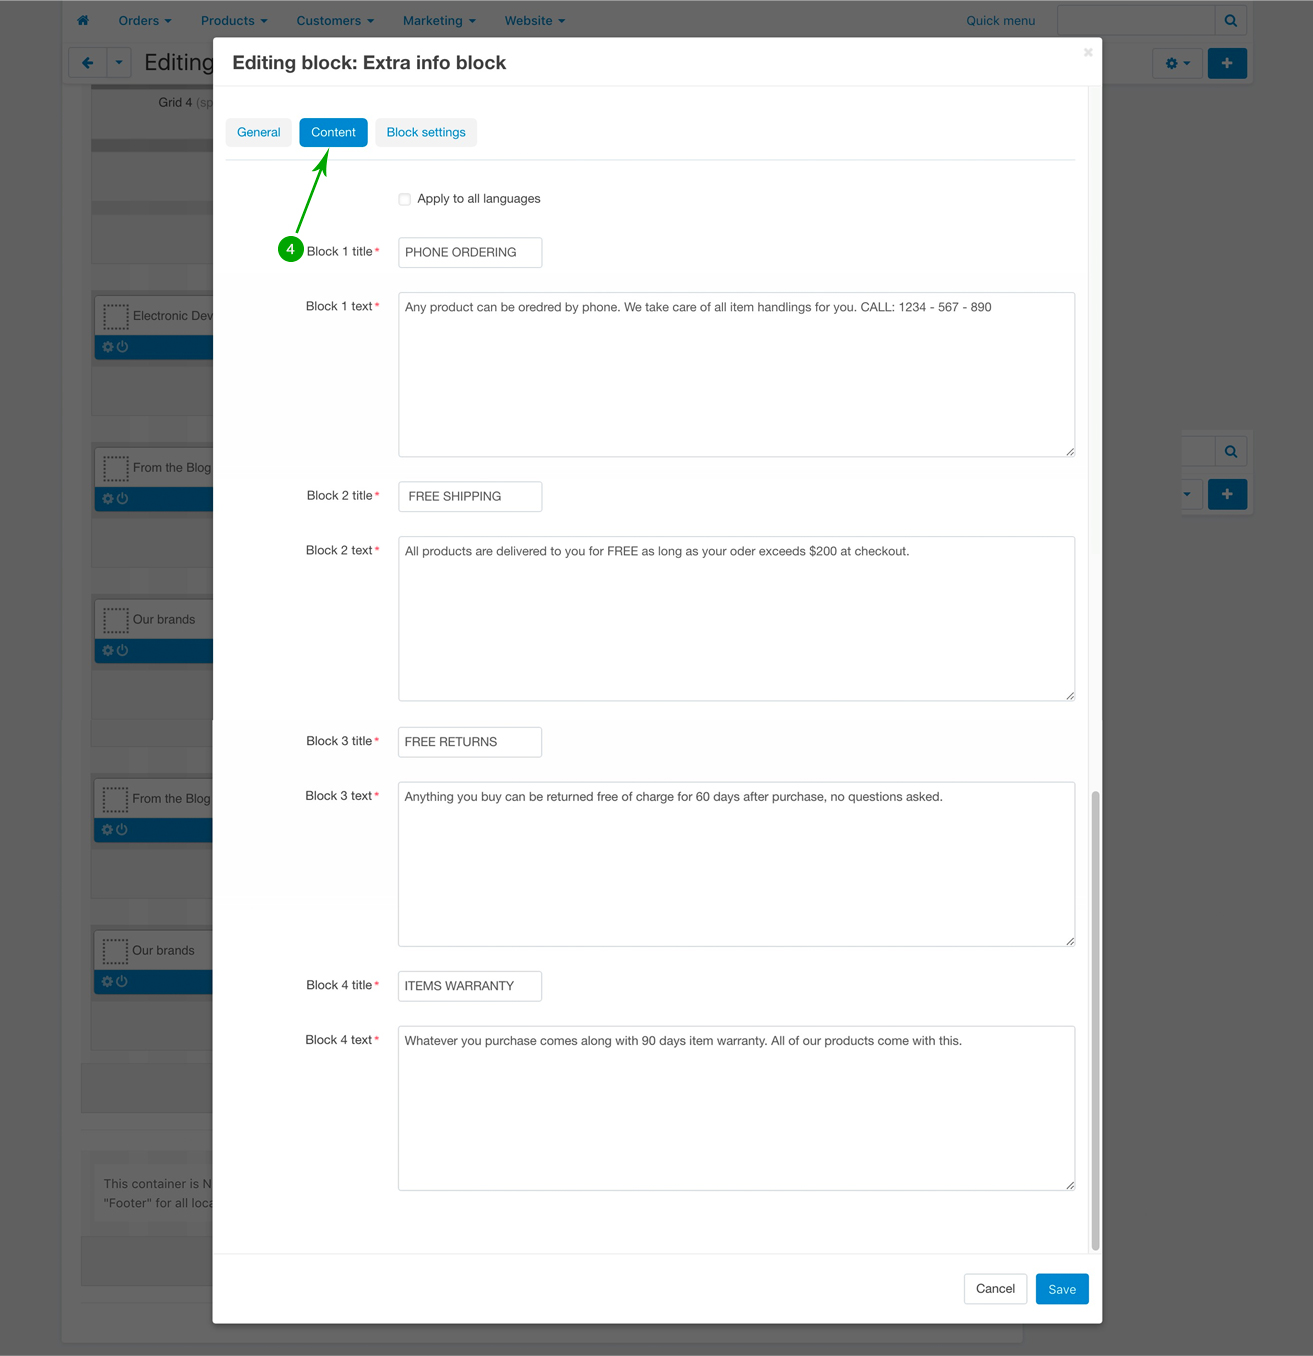
 

  • Step 5

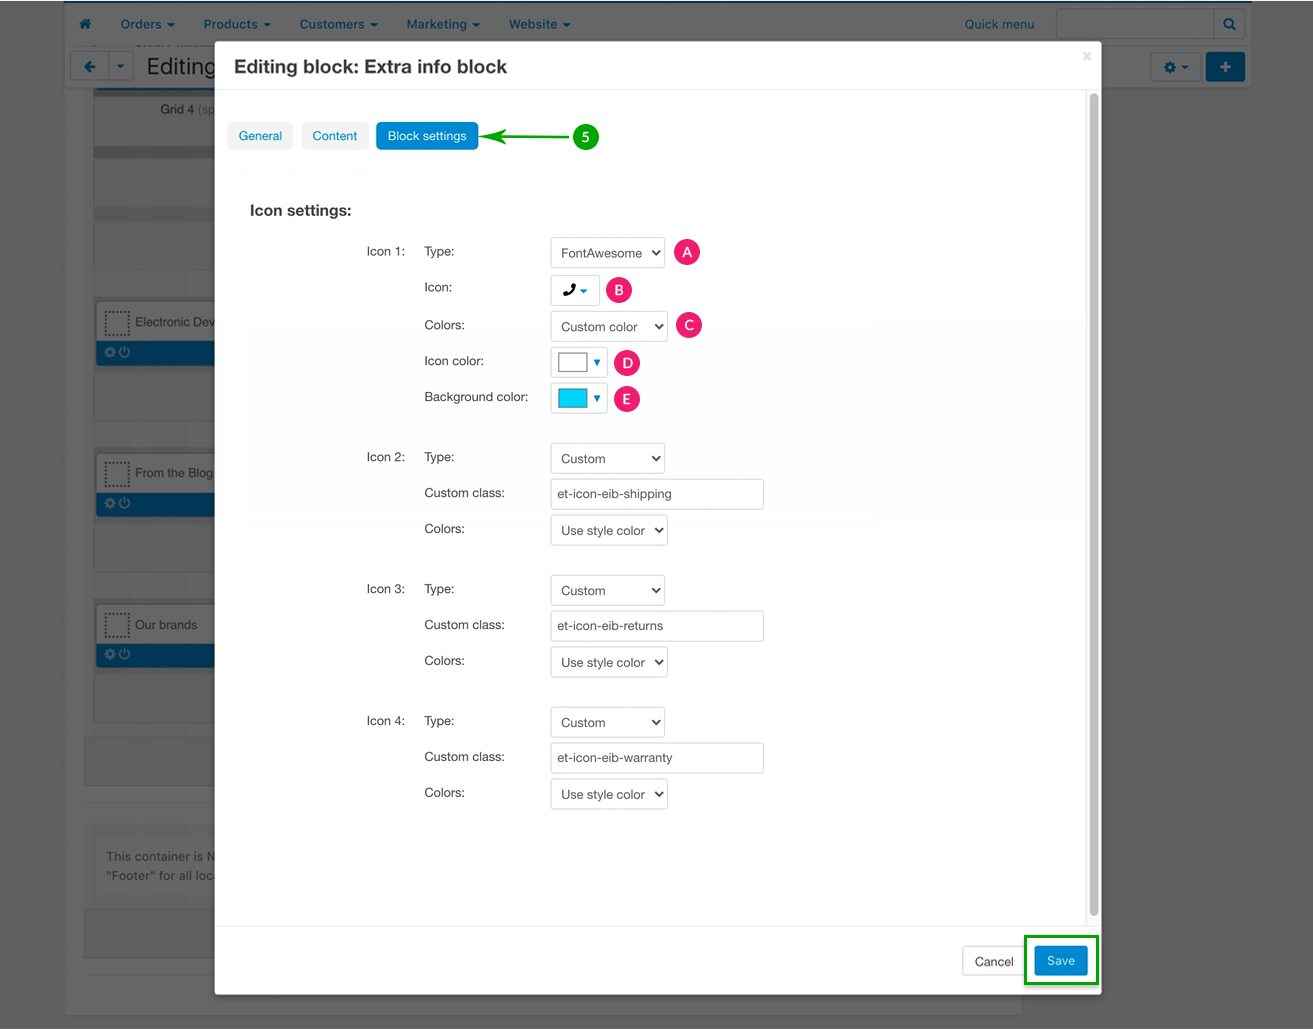
Next, under the “Block settings” tab you can choose your settings for the block background, icons and text.


Block settings
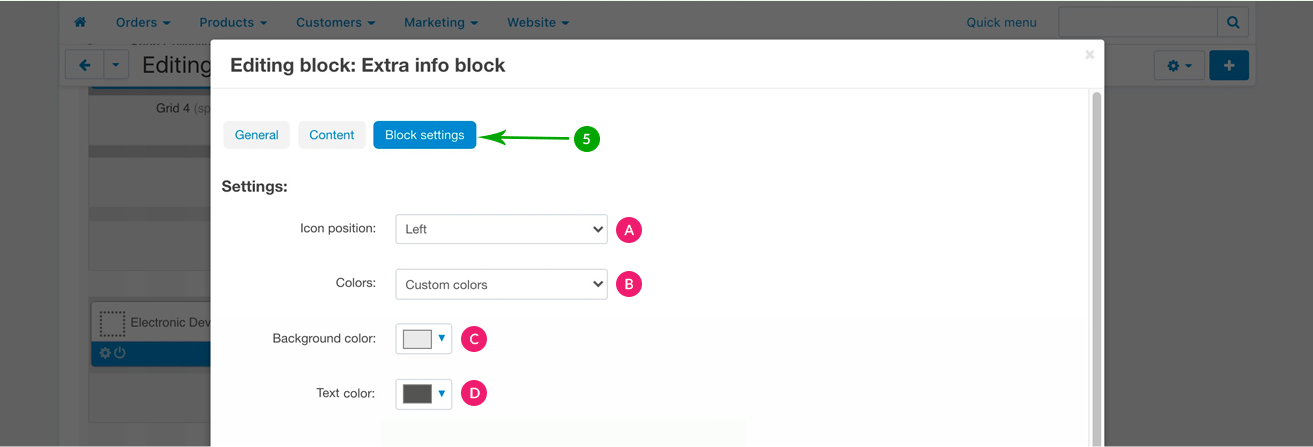
 

A: Icon position - Choose position of the icon in each of the 4 available sections. You can the icon to be displayed wither on Top or Left of the section text.
B: Colors - For the block colors you have two options that you can choose from: to use the theme style colors, which uses the colors we have pre-defined in the VIVAshop style that you have chosen to use, while the other choice is to use your own custom colors. So simply pick your choice. If you have chosen to use your own custom colors, options B and D will open.
C: Background color - Set the color for the block background by choosing it from the color picker, or insert your own color code.
D: Text color - Set the color for the text included in the 4 sections, by choosing it from the color picker, or insert your own color code.


Icon settings


A: Type - Choose the type of each icon that you want to include in each of the 4 sections of the “Extra info block”. You can either use a Font Awesome icon, or a Custom icon.
B: Icon/Custom class - If you choose a Font Awesome icon, all you need to do is to simply search or scroll down in order to pick the desired icon from the “Icon” dropdown. If you choose to add your own icon, then the your custom icon class needs to be added into the “Custom class” field.
C: Colors - For the icon color you have two options that you can choose from: to use the theme style color, which uses the color we have pre-defined in the VIVAshop style that you have chosen to use, while the other choice is to use your own custom color. So simply pick your choice.
D: Icon color - If in the previous step you have chosen to use a custom color, then a “Custom color” option will automatically be displayed. Set a color of your icon, by choosing it from the color picker, or insert your own custom color code.
E: Background color - The icon from each section of the “Extra info block” has a background in form of a circle. Set a color background colors for each icon, by choosing it from the color picker, or insert your own custom color code.


Testimonials block (”What our customers say”)
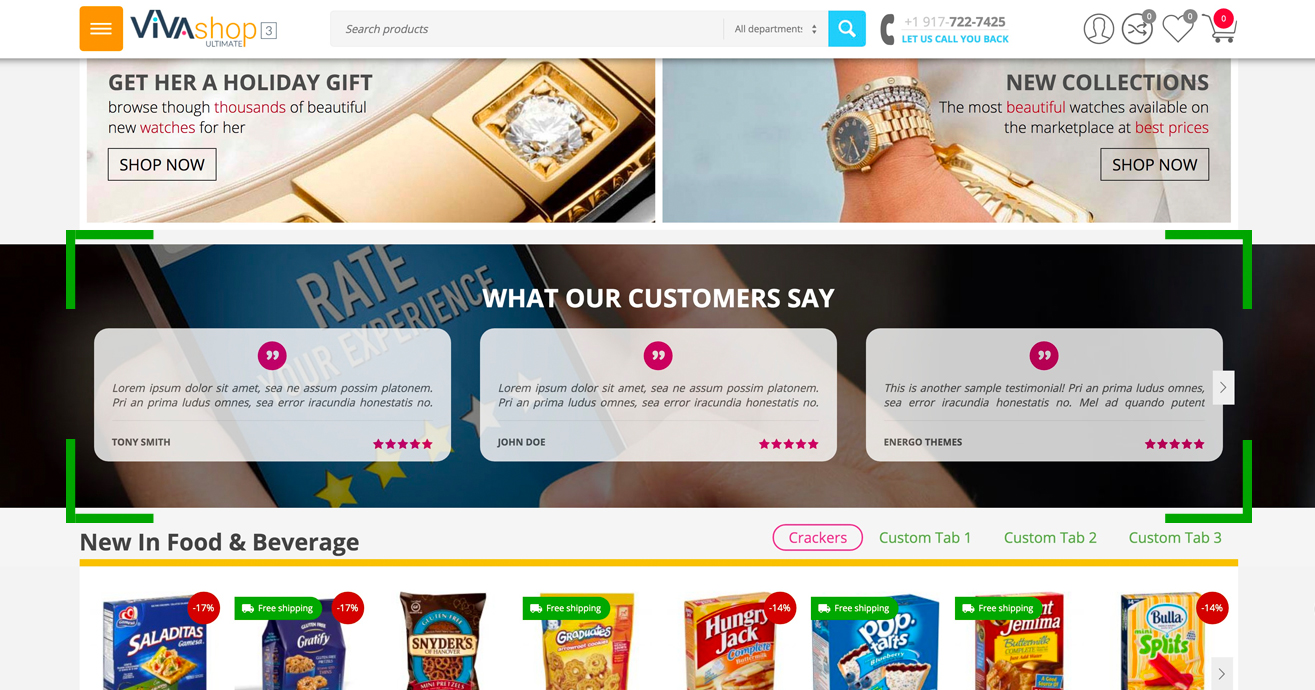


The theme homepage also contains a block where you can display your customers’ feedback. This block can be customized in accordance to your own wishes, so please follow the steps below in order to choose your own settings for your this block:

  • Step 1

In your admin panel, go to "Design” - "Layouts”:


  • Step 2

Click on the "Homepage” tab


  • Step 3

Scroll down and look for the “What our customers say” block, and click on the “Block options” of this block
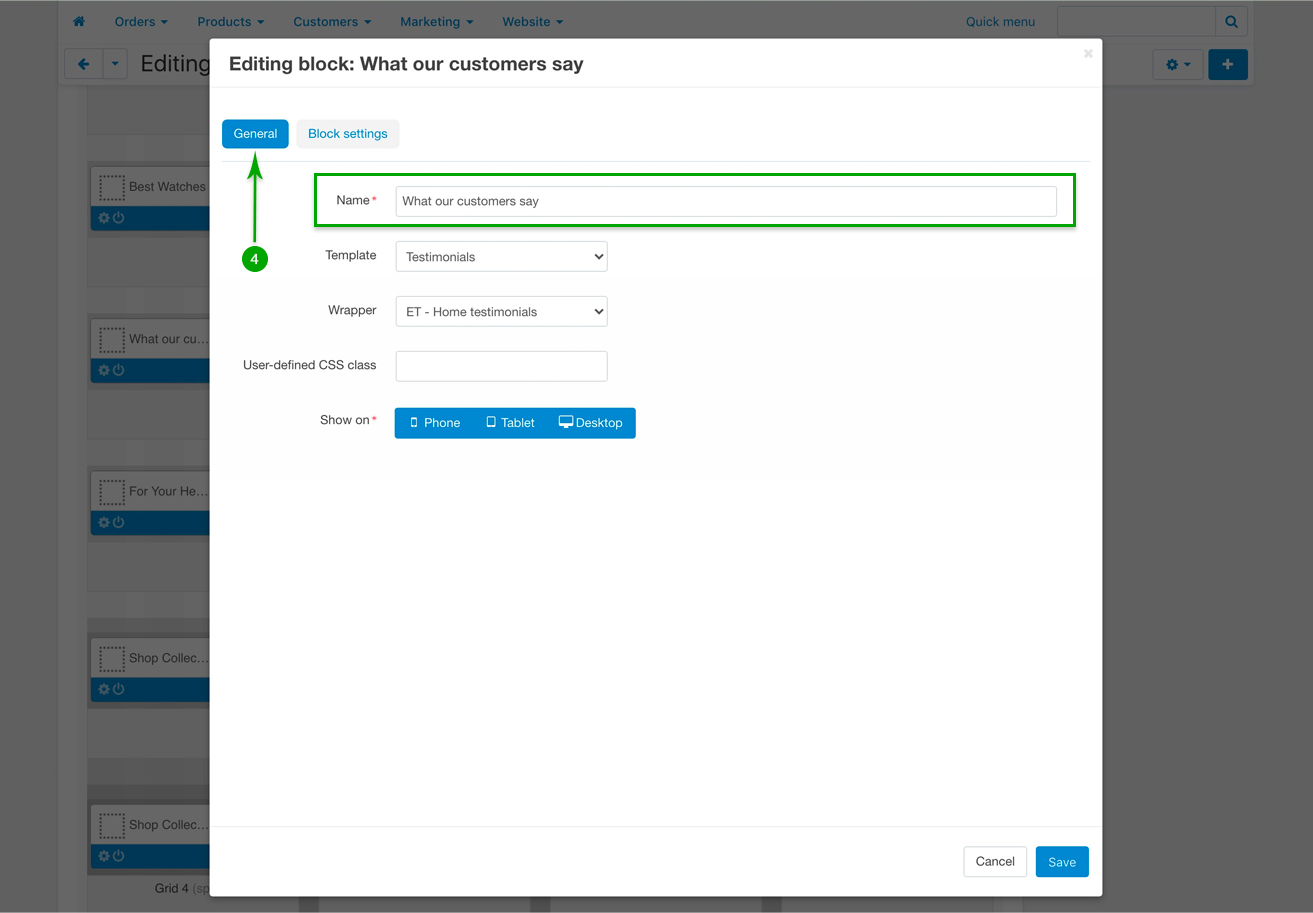
 

  • Step 4

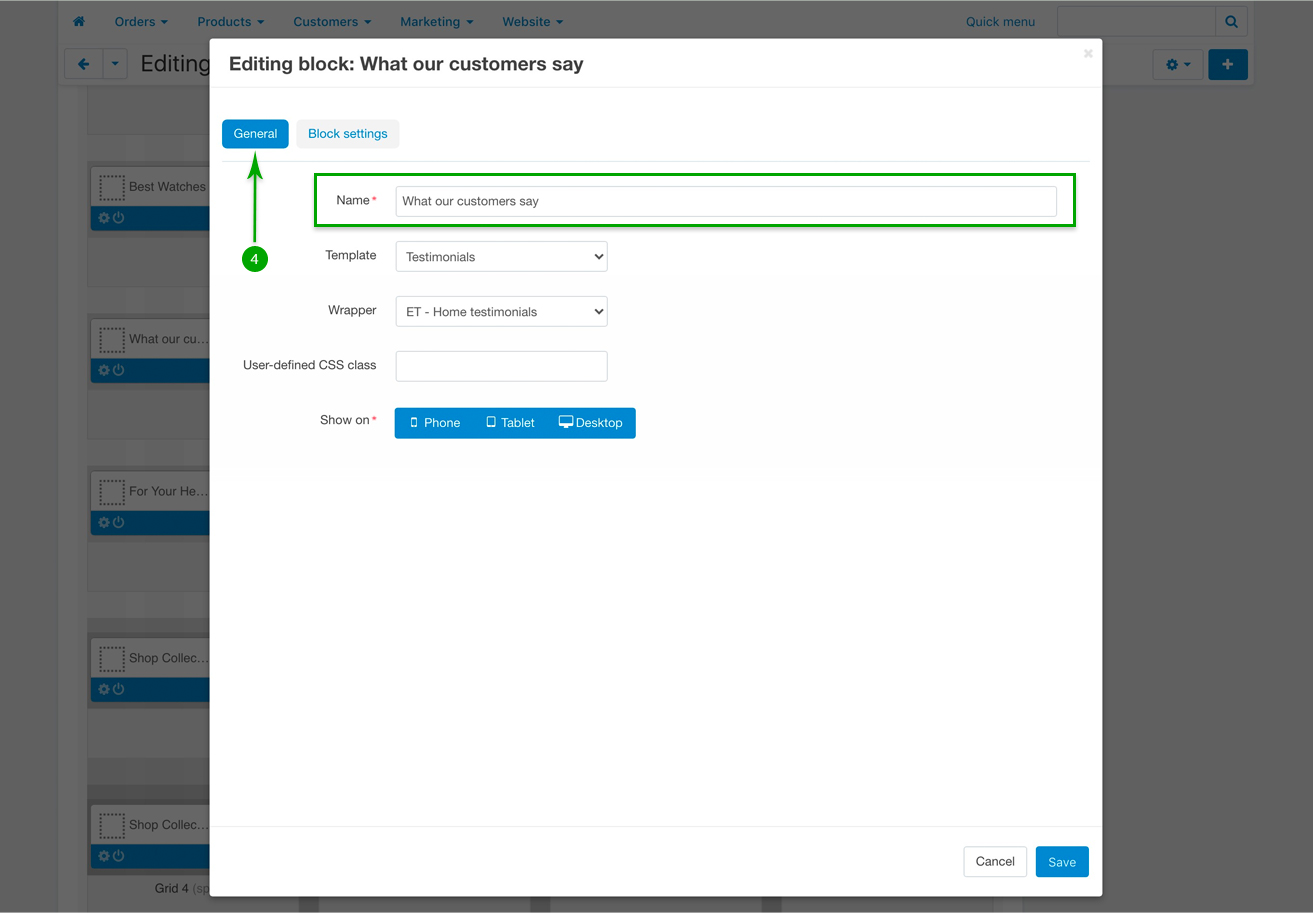
In the newly opened pop-up window, under the “General” tab, type your desired block name. This name will appear as a title for the block on your homepage. The “Template” should remain “Testimonials”, and the Wrapper should also remain “ET - Home testimonials”.
 

  • Step 5

Next, under the “Block settings” tab you can choose your settings for the testimonials block, as well as the background and color settings. Click the bottom right “Save” button when you’re done.


Block settings
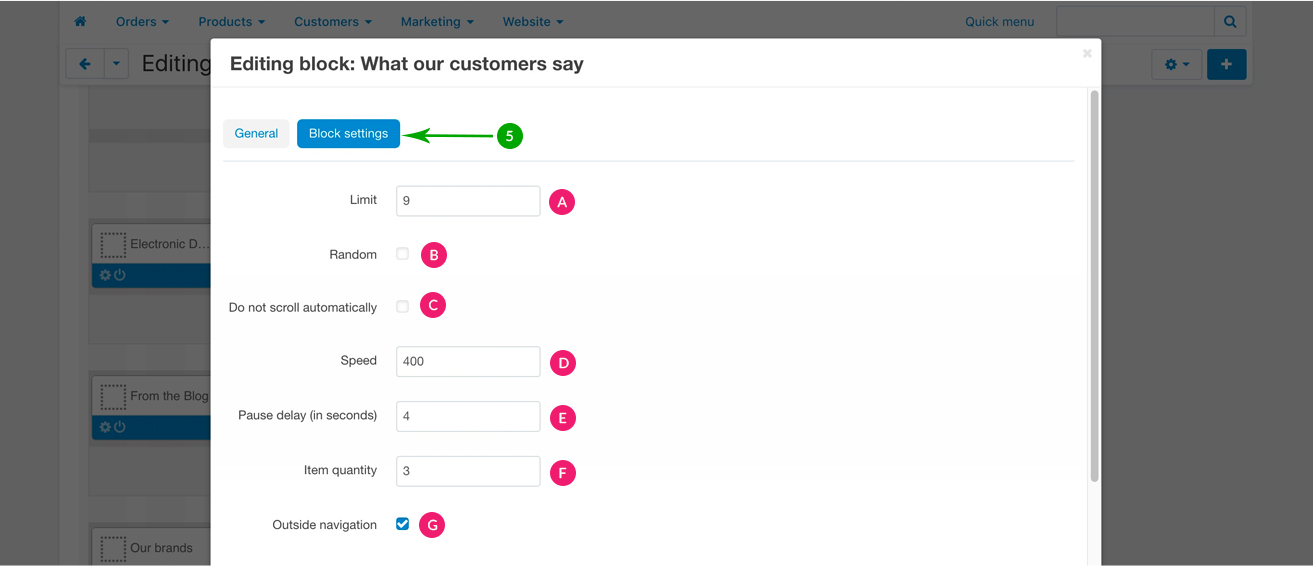
 

A: Limit - The maximum number of testimonials shown in the “What our customers say” block.
B: Random - Display testimonials randomly.
C: Do not scroll automatically - Select this option if the testimonials scroller should not move automatically.
D: Speed - Select the scrolling speed. The value is in milliseconds.
E: Pause delay (in seconds) - The time between scrolling sessions.
F: Item quantity - The number of testimonials displayed at once (per scrolling session).
G: Outside navigation - If checked, the VIVAshop specific left-right navigation arrows will be displayed


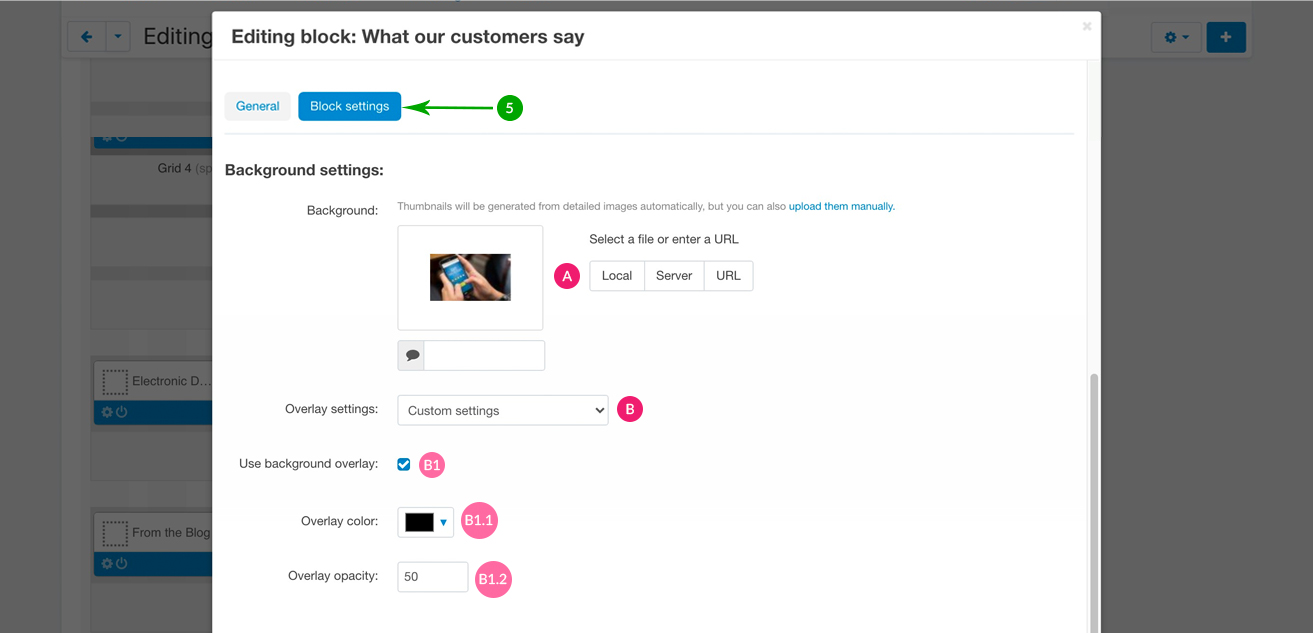
Background settings


A: Background image - Choose a background image. The recommended size is 2400px x 1200px.
B: Overlay settings - This is a custom color that you can apply over the selected image. You have two options that you can choose from: to use the theme style settings, which uses the settings we have pre-defined in the VIVAshop style that you have chosen to use, while the other choice is to use your own custom settings. Should you choose to use your own custom settings, option B1 (”Use background overlay”) will open.
B1: Use background overlay - This option needs to be checked if you want to use a background overlay (it is already checked by default). Once this option is selected, another 2 options will open (B1.1 and B1.2).
B1.1: Overlay color - Set a color for your background overlay, by choosing it from the color picker, or insert your own color code.
B1.2: Overlay opacity - Set the opacity percentage for your background overlay (only a number should be inserted without the “%” sign).

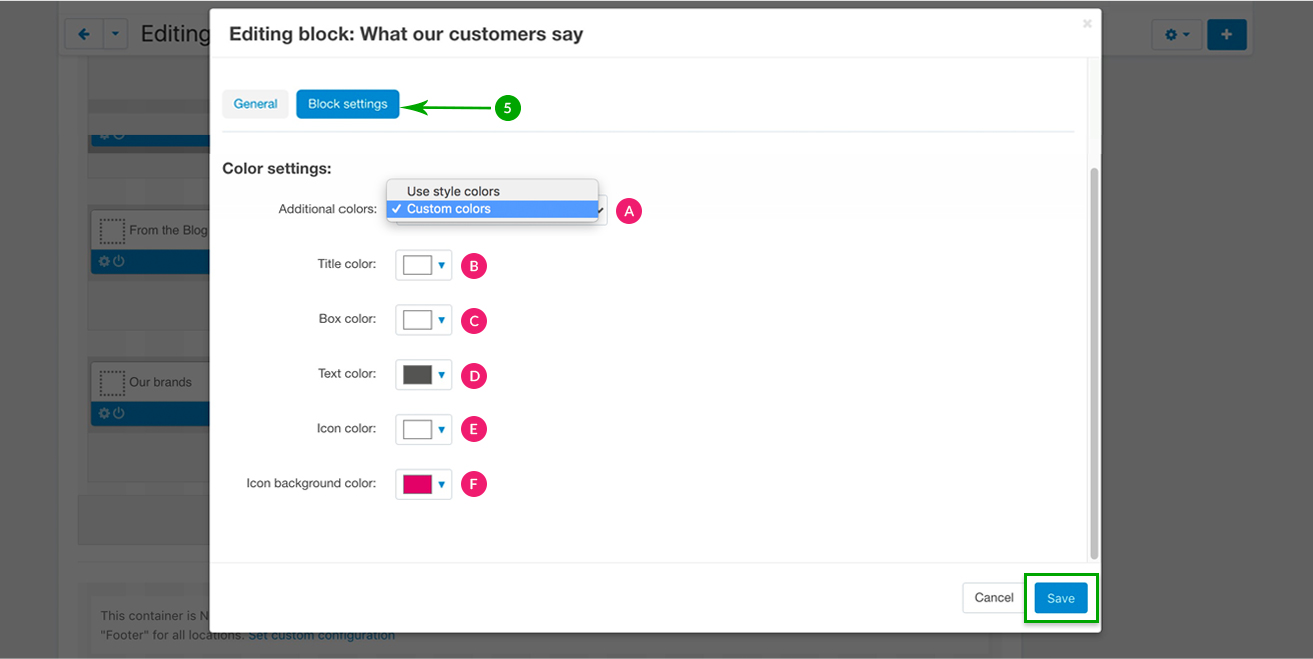
Colors settings


A: Additional colors - You have two options that you can choose from: to use the theme style colors, which uses the settings we have pre-defined in the VIVAshop style that you have chosen to use, while the other choice is to use your own custom colors. Should you choose to use your own custom custom, the rest of the options will display.
B: Title color - Each testimonial is displayed inside an individual box. Choose the color of this box.
C: Text color - The color of the testimonial text, as well as the color of the customer name who left the testimonial.
D: Icon color - Each testimonial has an icon displayed inside the testimonial box. Choose the color of this icon.
E: Icon background color - Each testimonial icon has a circled background. Pick the color of this background.


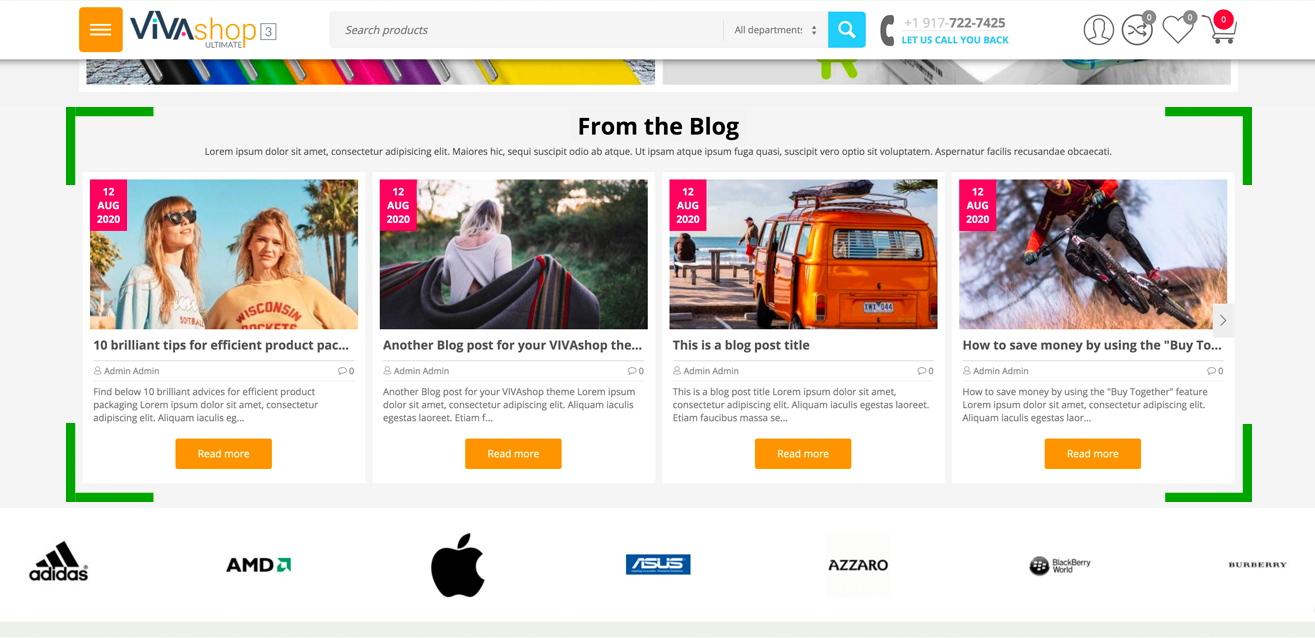
Blog scroller ("From the blog")


On the VIVAshop theme homepage you can display a scroller with any articles you have created in your blog. Follow the steps below in order to learn how to add blog posts to your homepage blog scroller, as well as how to configure it:

  • Step 1

In your admin panel, go to "Design” - "Layouts”:


  • Step 2

Click on the "Homepage” tab


  • Step 3

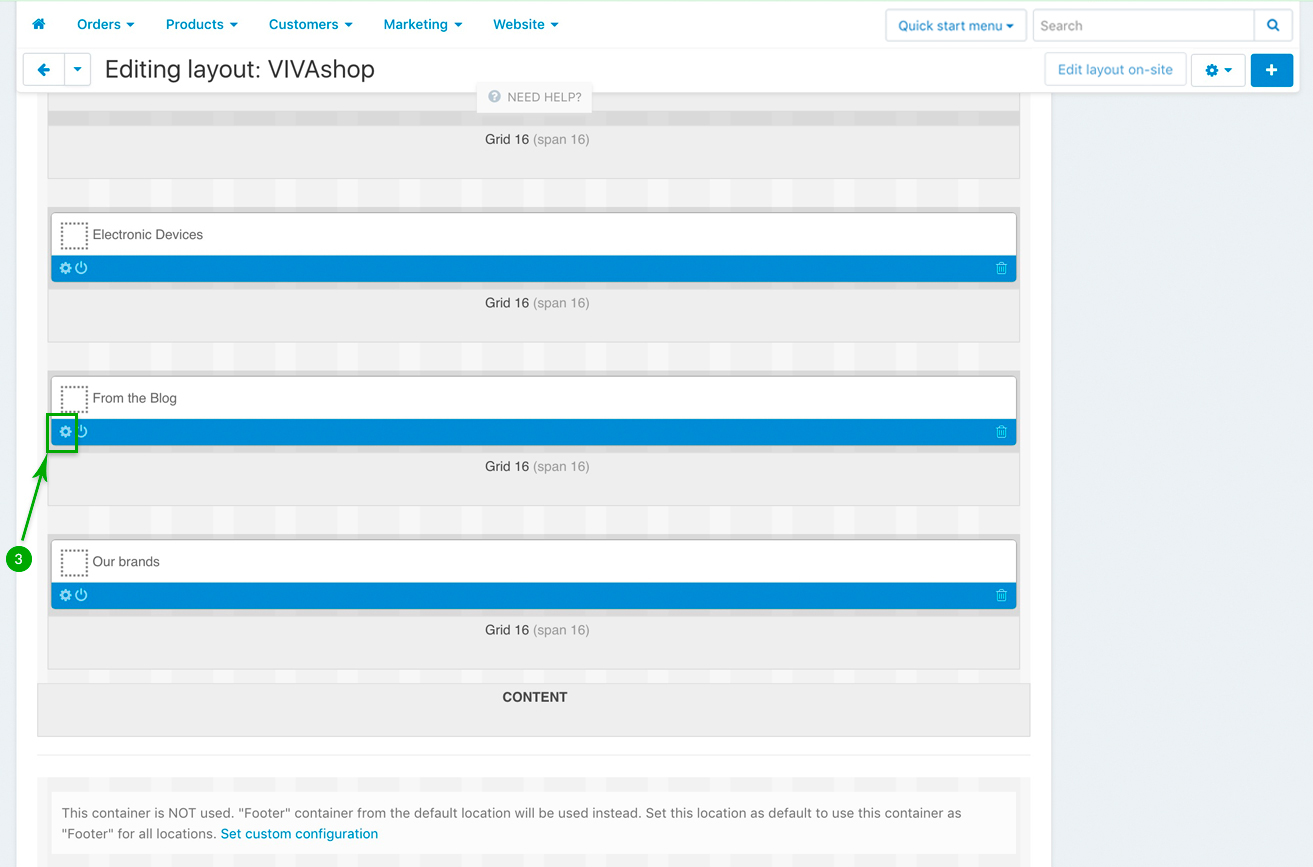
Scroll down and look for the “From the blog” block, and click on the “Block options” of this block
 

  • Step 4

Under the “Content” tab select the content of your “From the blog” block, and then lick on the bottom right “Save” button.
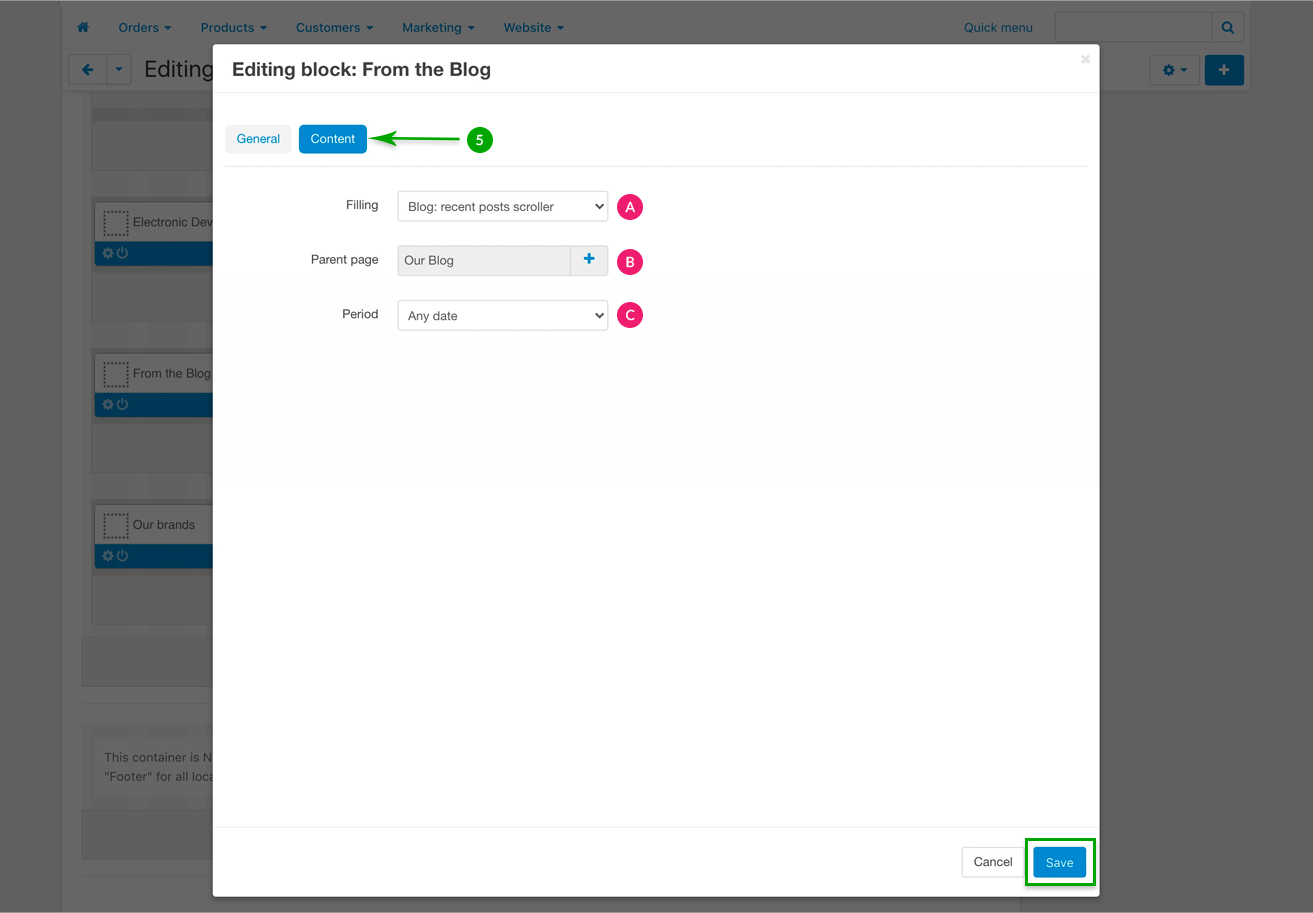
 

A: Filling - Keep the option “Blog: recent posts scroller
B: Parent page - Select the parent page which includes the blog posts you want to display
C: Period - Chose the desired period from the dropdown


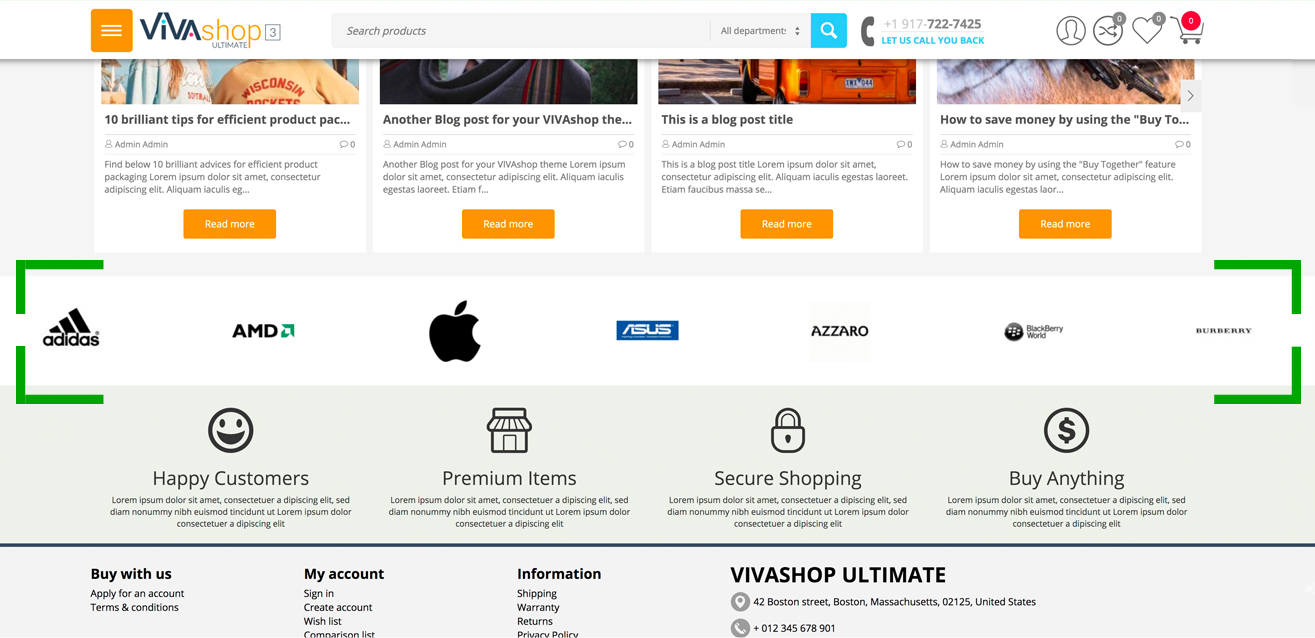
Brands scroller


Display your brands on your shop homepage using the Brands scroller which you can simply configure it by following the guidelines below:

  • Step 1

In your admin panel, go to "Design” - "Layouts”:


  • Step 2

Click on the "Homepage” tab


  • Step 3

Scroll down and look for the “Our brands” block, and click on the “Block options” of this block
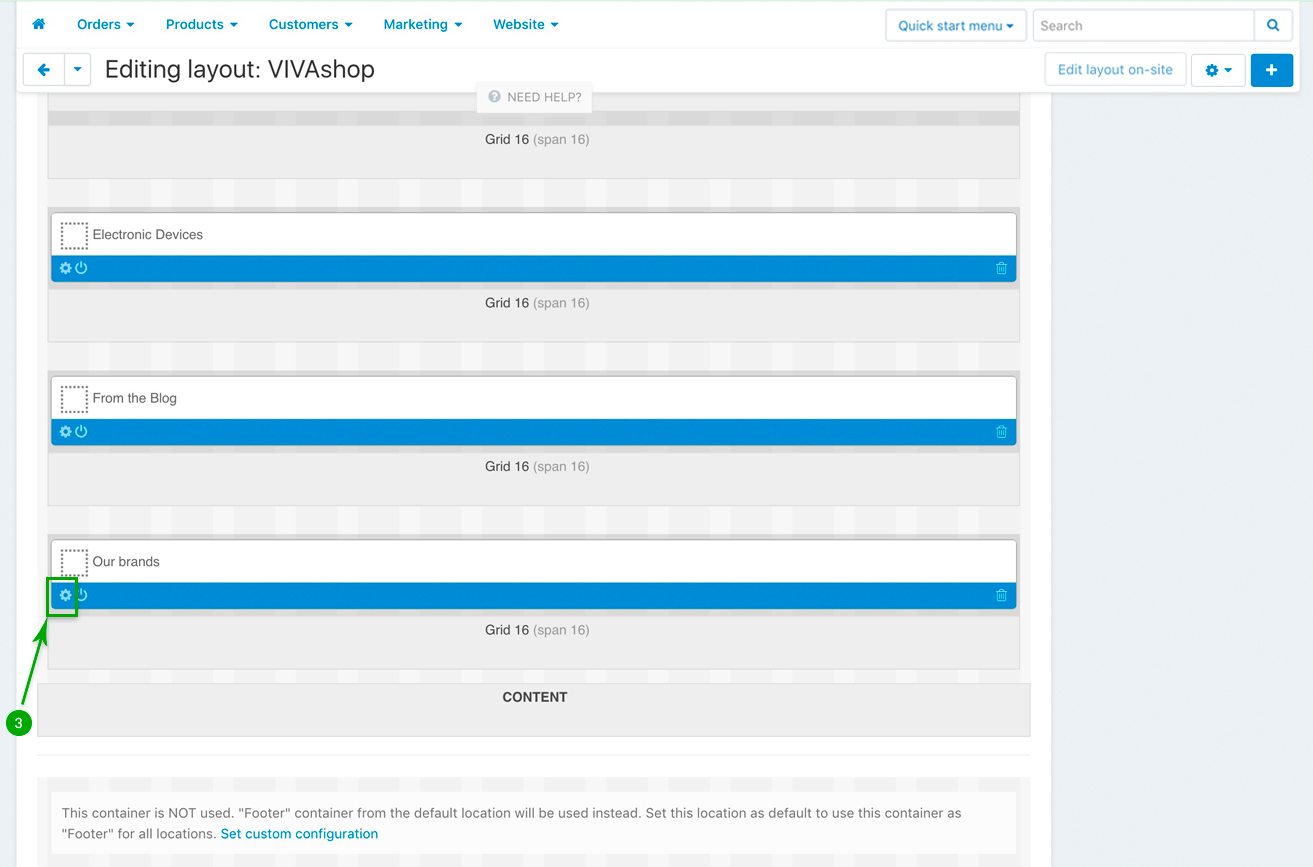
 

  • Step 4

Under the “General” tab, give your block a custom name if you want, the “User-defined CSS class” should remain “homepage-our-brands”. If you click on the “Settings” link right next to the “Template” field, the blog scroller options will be displayed so you may configure it. Choose your configuration options, then click on the bottom right “Save” button.
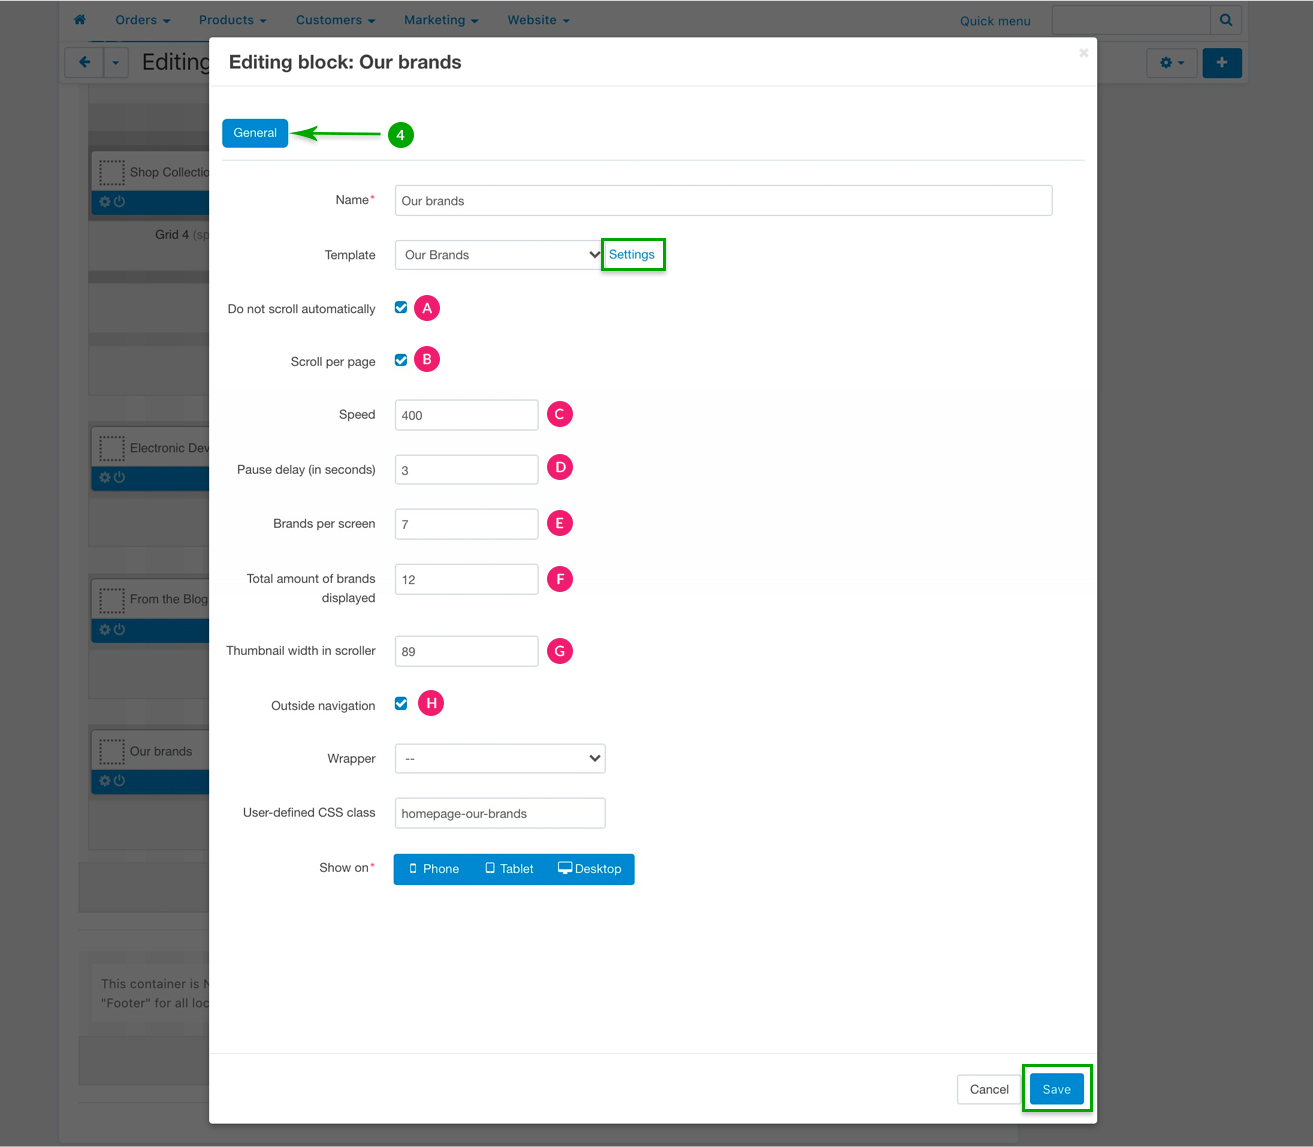
 

A: Do not scroll automatically - Select this option if the Brands scroller should not move automatically.
B: Scroll per page - Check this box if you want to scroll the Brands by brands pages. It this option remains unchecked, Brands will scroll one by one.
C: Speed - Select the scrolling speed. The value is in milliseconds.
D: Pause delay (in seconds) - The time between scrolling sessions.
E: Brands per screen - Number of Brands displayed on the screen
F: Total amount of brands displayed - The total number of the Brands to be displayed
G: Thumbnail width in scroller - Choose your desired value in pixels
H: Outside navigation - If checked, the VIVAshop specific left-right navigation arrows will be displayed


Other homepage blocks


1. Footer info block


Simply add some other important and catchy information specific to your store using the “Footer info block”. This block is not only displayed on your homepage, but on every single page of your shop. The way you configure this block is just the same as the “Extra info block” which we explained above, so please follow the same steps we described for “Extra info block”.
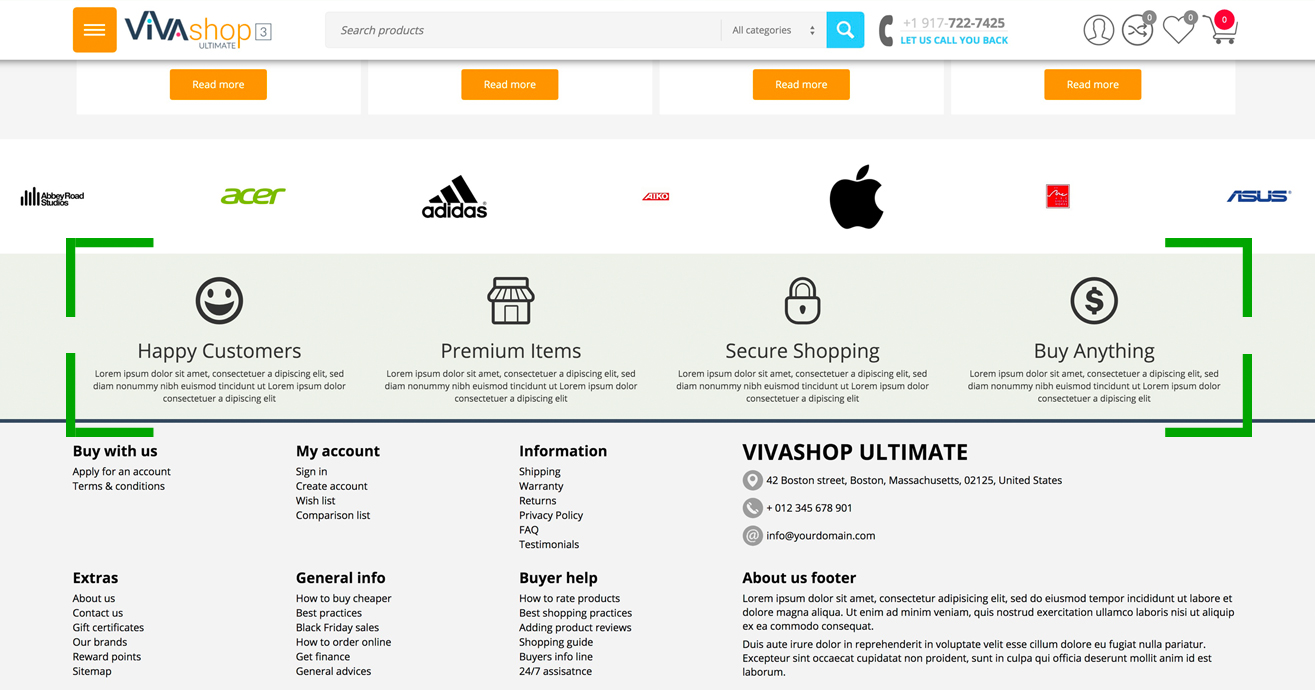
 

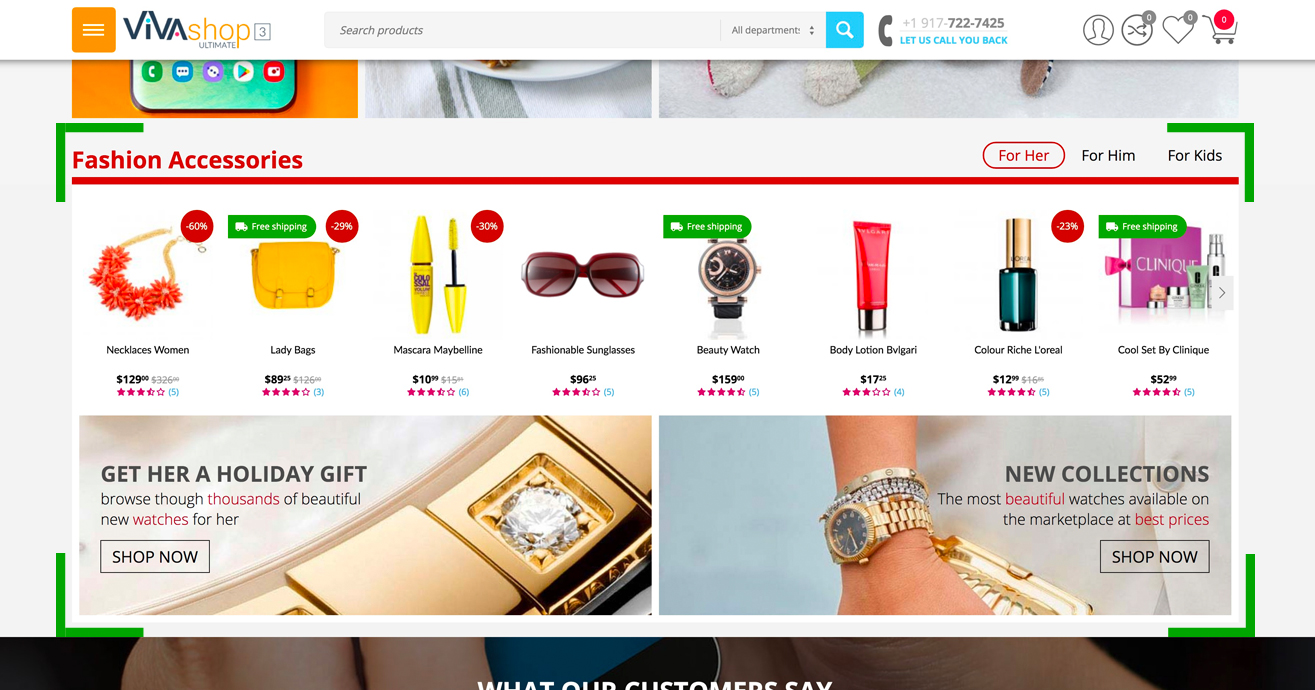
2. Featured product and banner tabs


On the theme homepage we have included several blocks with featured products and banners. These blocks can be created with the help of the “Featured product and banner tabs” add-on that we have developed and included in the theme package. Therefore, please refer to section “Featured product and banner tabs” in order to learn how to create and configure these blocks.